Kubernetes(k8s) v1.16とNvidia-Docker2を用いたマルチノードDeepLearning環境の構築 Part2
この記事は近畿大学 Advent Calendar 2019 - Qiita 24日目の記事です.
はじめに
この記事は下記記事の続きですので,下記記事を読んだ後に読むことを推奨します.
前回の構築ではVolumeのhostPathを使用してWorker物理マシン上のディスクにあるディレクトリを直接マウントしました.仮構築であればそれでも良いですが,本番環境で使用する際はデータベースサーバなどを用意して使用するのが好ましいと考えられます. そこで今回はNFSサーバを用意して,PersistentVolumeを前回構築したKubernetes Cluster上にマウントしてみます.
その後図1の左側の準備を行ってKubernetes Cluster上でのリモート開発環境を構築していきたいと思います.
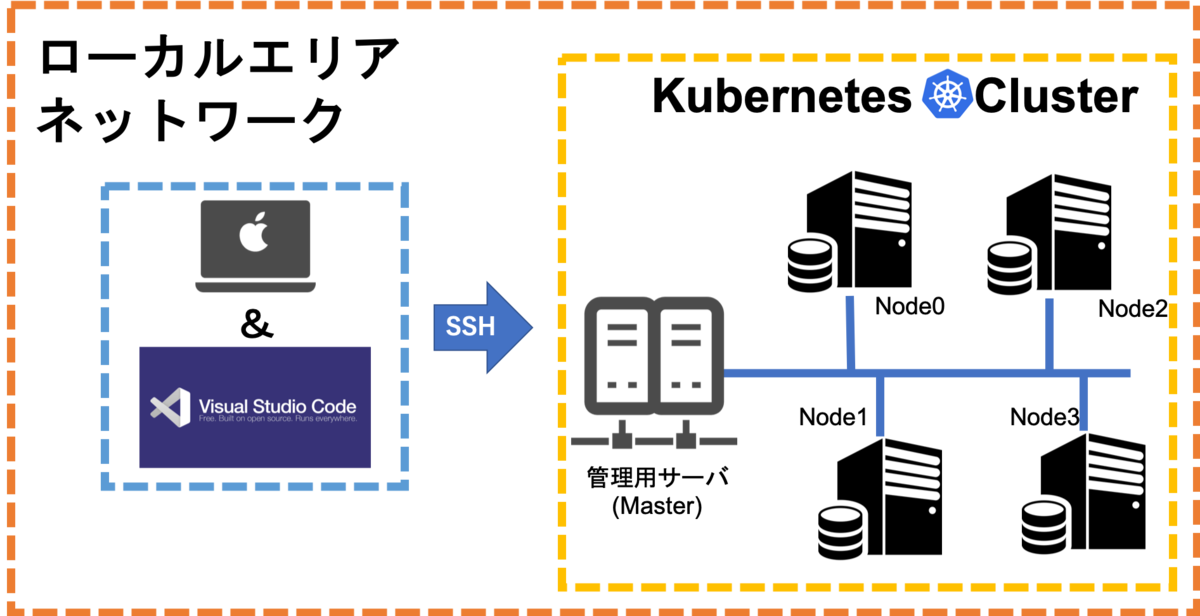
また前回計算リソースの監視としてKubernetes Dashboard2.0を用いましたが,Kubernetesと同じくCNCFのGraduatedプロジェクトであるPrometheus と可視化ツールのGrafanaを用いてより高度な死活監視システムの構築を行って行きたいと思います.
最後に本記事はKubernetesやDockerについてある程度知識があることを前提に書いているため詳細は記述しません.私の過去記事や書籍など読んで知識を身につけてきてください.
Strageリソース
Kubernetesには大きく分けてVolumeとPersistentVolumeと呼ばれる二種類のストレージシステムが用意されています.Part1では作業簡略化のためVolumeを使用してコンテナ内のStorageリソースを構築しましたが,今回はPersistentVolumeを使用してコンテナ内Strageリソースを構築していきたいと思います. またKubernetesではVolumeとPersistent Volumeで対応されているものは違いますが,単純なファイルシステム(FS)からオブジェクトストレージシステムや分散ストレージシステムにも対応しています.
Volume
Volumeでは以下のような種類をサポートしています.
- awsElasticBlockStore
- azureDisk
- azureFile
- cephfs
- cinder
- configMap
- csi
- downwardAPI
- emptyDir
- fc (fibre channel)
- flexVolume
- flocker
- gcePersistentDisk
- gitRepo (deprecated)
- glusterfs
- hostPath
- iscsi
- local
- nfs
- persistentVolumeClaim
- projected
- portworxVolume
- quobyte
- rbd
- scaleIO
- secret
- storageos
- vsphereVolume
一つ一つの仕様については以下の公式ガイドを参照してください.
Volumeとは主にPodなどをデプロイする際マニフェストに直接マウントするディレクトリなどを記述することで使用可能になるStrageリソースのことです.そのためKubernetes上からボリュームの新規作成や削除などのファイル操作をすることはできませんし,マニフェストでは既存のボリュームしか指定できません.
前回使用したhostPathではWorkerホストマシン上のディレクトリを直接マウントする方法になってしまい,利便性にかけてしまいます.
Persistent Volume
Persistent Volumeでは以下の種類をサポートしています.
- GCEPersistentDisk
- AWSElasticBlockStore
- AzureFile
- AzureDisk
- CSI
- FC (Fibre Channel)
- FlexVolume
- Flocker
- NFS
- iSCSI
- RBD (Ceph Block Device)
- CephFS
- Cinder (OpenStack block storage)
- Glusterfs
- VsphereVolume
- Quobyte Volumes
- HostPath(シングルノードクラスタのみで使用可能,マルチノードクラスタでは機能しない.)
- Portworx Volumes
- ScaleIO Volumes
- StorageOS
それぞれの詳細な仕様は以下の公式ガイドを参照してください.
今回はこれらのうち比較的簡単に用意ができるNFSを使用していきます.Persistent VolumeでのNFSは容量制限の機能が無かったりと他のプラグインと違うところもありますので,留意しておいてください.
準備
今回はNetGear社製のReadyNASにあるNFAサーバ機能を利用するためサーバ側の構築はしませんが,各自でNFSサーバの準備をしてください.
NFSサーバの構築が終了したら,NFSクライアントの準備を行うため下記のコマンドを全てのMasterとWorkerで実行してください.
$ sudo apt-get install -y nfs-client
Persistent Volumeの作成
以下のマニフェスト「sample_persistent_volume.yaml」を作成します. 以下のマニフェストではサンプルとしてhdd・ssd・nvmeのラベルのついた三種類の容量のボリュームを作成していますが,サンプルとして表しているだけであり実際の物理ストレージとは異なります.
apiVersion: v1
kind: PersistentVolume
metadata:
  name: sample-pv01
  labels:
    type: nfs
    environment: hdd
    speed: slow
spec:
  capacity:
    storage: 500Gi
  volumeMode: Filesystem
  accessModes:
    - ReadWriteOnce
  persistentVolumeReclaimPolicy: Retain
  storageClassName: manual
  nfs:
    server: xxx.xxx.xxx.xxx
    path: /data/workspace/tenzen/k8s/test_volume/sample01
---
apiVersion: v1
kind: PersistentVolume
metadata:
  name: sample-pv02
  labels:
    type: nfs
    environment: ssd
    speed: high
spec:
  capacity:
    storage: 400Gi
  volumeMode: Filesystem
  accessModes:
    - ReadWriteOnce
  persistentVolumeReclaimPolicy: Retain
  storageClassName: manual
  nfs:
    server: xxx.xxx.xxx.xxx
    path: /data/workspace/tenzen/k8s/test_volume/sample02
---
apiVersion: v1
kind: PersistentVolume
metadata:
  name: sample-pv03
  labels:
    type: nfs
    environment: Nvme
    speed: much_high
spec:
  capacity:
    storage: 300Gi
  volumeMode: Filesystem
  accessModes:
    - ReadWriteOnce
  persistentVolumeReclaimPolicy: Retain
  storageClassName: manual
  nfs:
    server: xxx.xxx.xxx.xxx
    path: /data/workspace/tenzen/k8s/test_volume/sample03
マニフェストをいきなり貼られても理解不能な方もいらっしゃると思うので,作成したマニフェストのわかりにくいだろうと思う項目の解説を行います.
metadata.labels
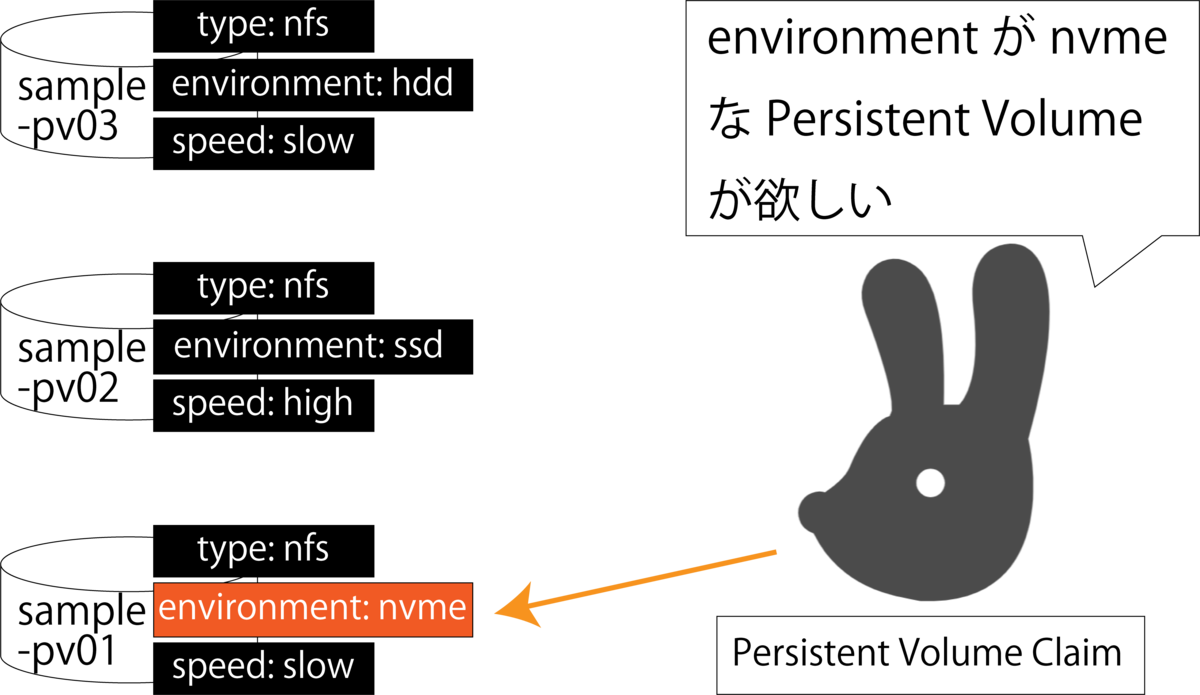
metadata.labels.type・metadata.labels.environment・metadata.labels.speedはPersistent Volumeを作成する上でのラベル情報になります.ラベル情報なので必須項目ではないのですが,ラベルを設定しておくことで次の章のPersistent Volume Claimでラベル情報を元にPersistent Volumeを探し出してくることができます.上記例では「type」・「environment」・「speed」三種類のラベルを設定しています.
spec.capacity.storage
作成するPersistent Volumeの容量を定義します.
spec.accessModes
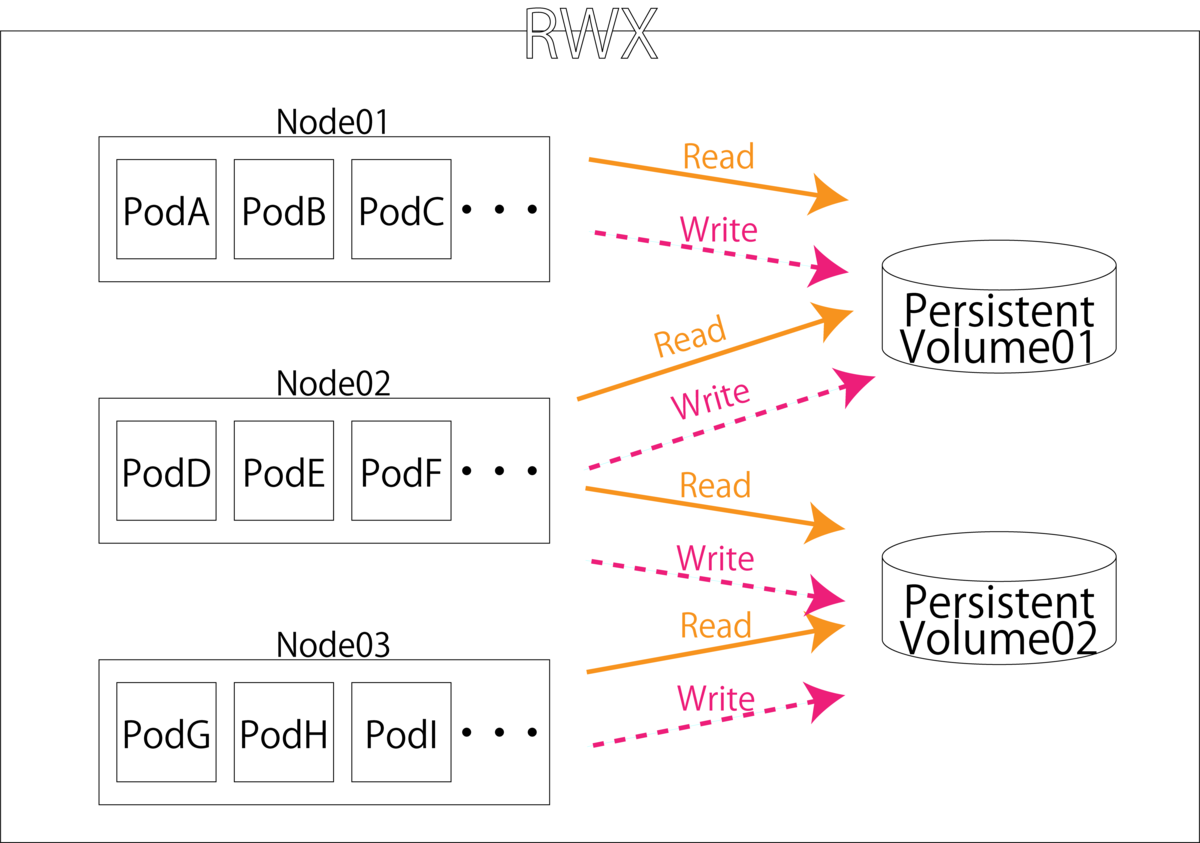
ボリュームへのアクセス制限を行います.アクセス制限の種類は三種類用意されています.
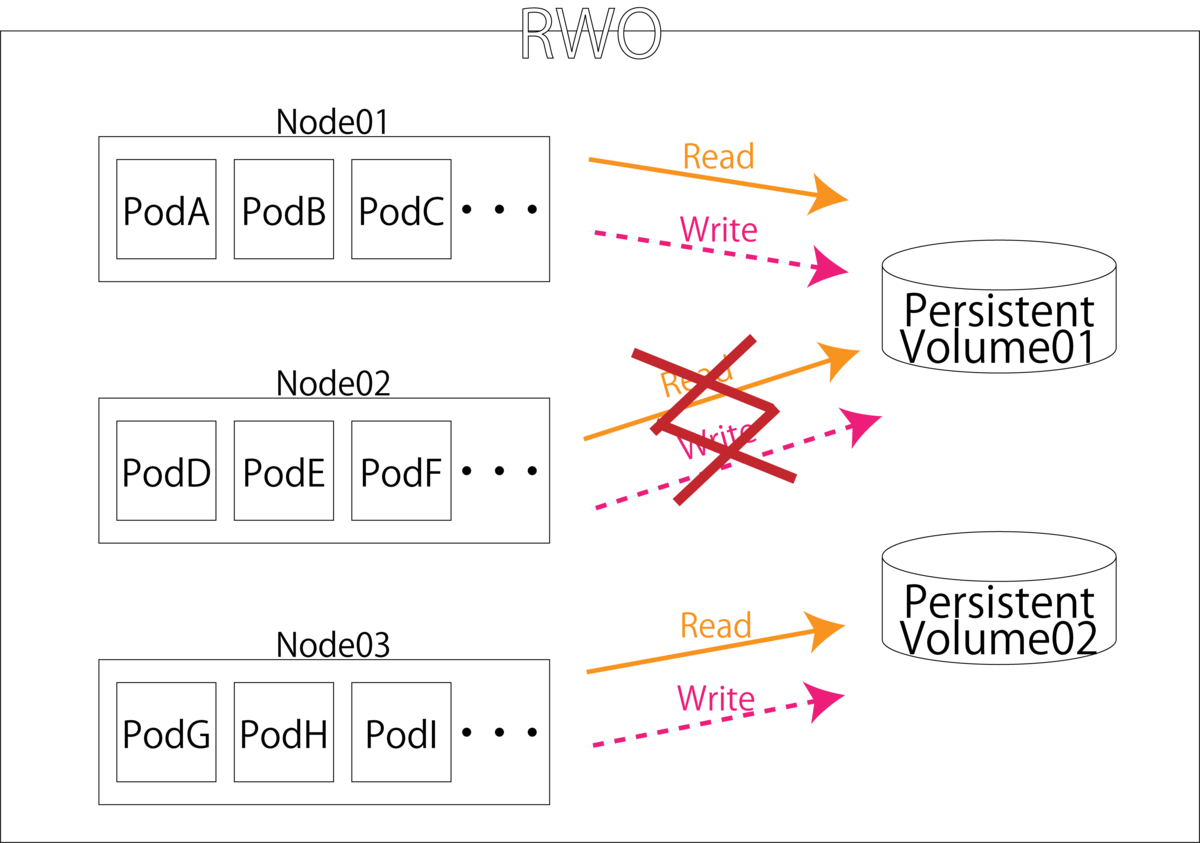
- ReadWriteOnce(RWO)
- 単一ノードからのみRead/Writeを許可する.
- 単一ノードからのみ許可していますが,Kubernetesは要求リソースを満たすnodeにPodを自動デプロイするため単一ノードというよりは単一Podというイメージです.
- 単一ノードからのみRead/Writeを許可する.
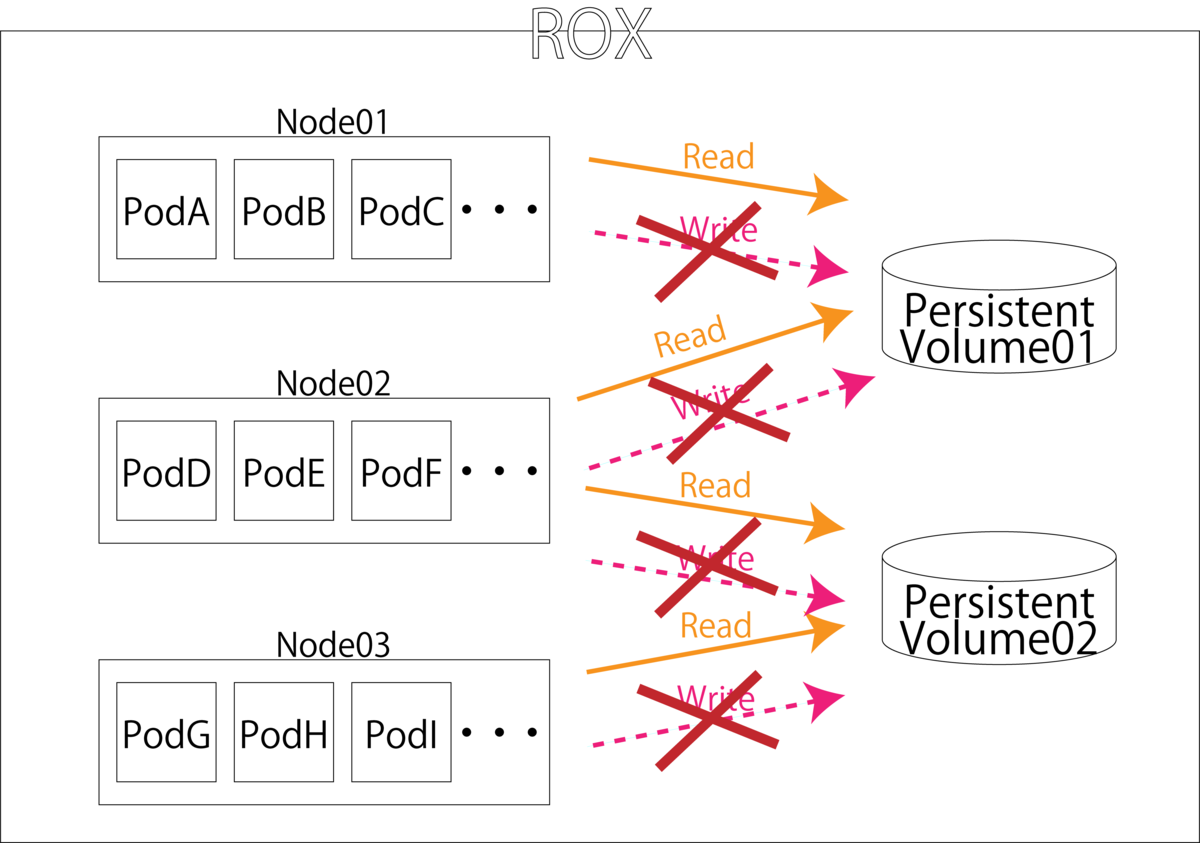
- ReadOnlyMany(ROX)
- 複数ノードからのReadのみ許可する.
- ROXの場合書き込み要求があるPodが存在してしまうと,該当ノード以外のノードでマウントできなくなってしまうため,Persistent Volume ClaimにはreadOnlyを指定する必要があります.
- 複数ノードからのReadのみ許可する.
- ReadWriteMany(RWM)
spec.persistentVolumeReclaimPolicy
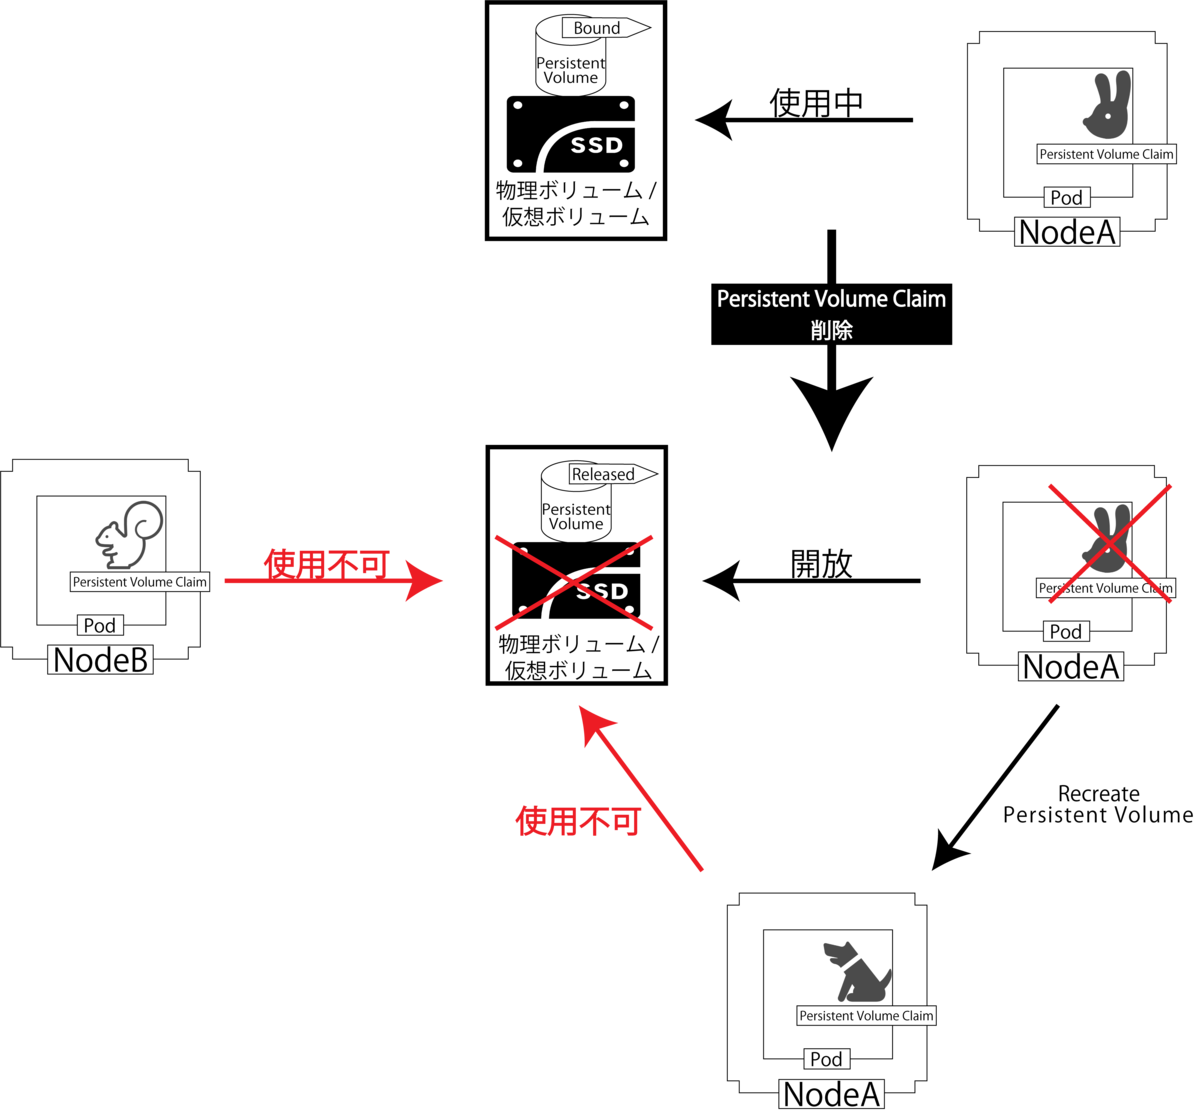
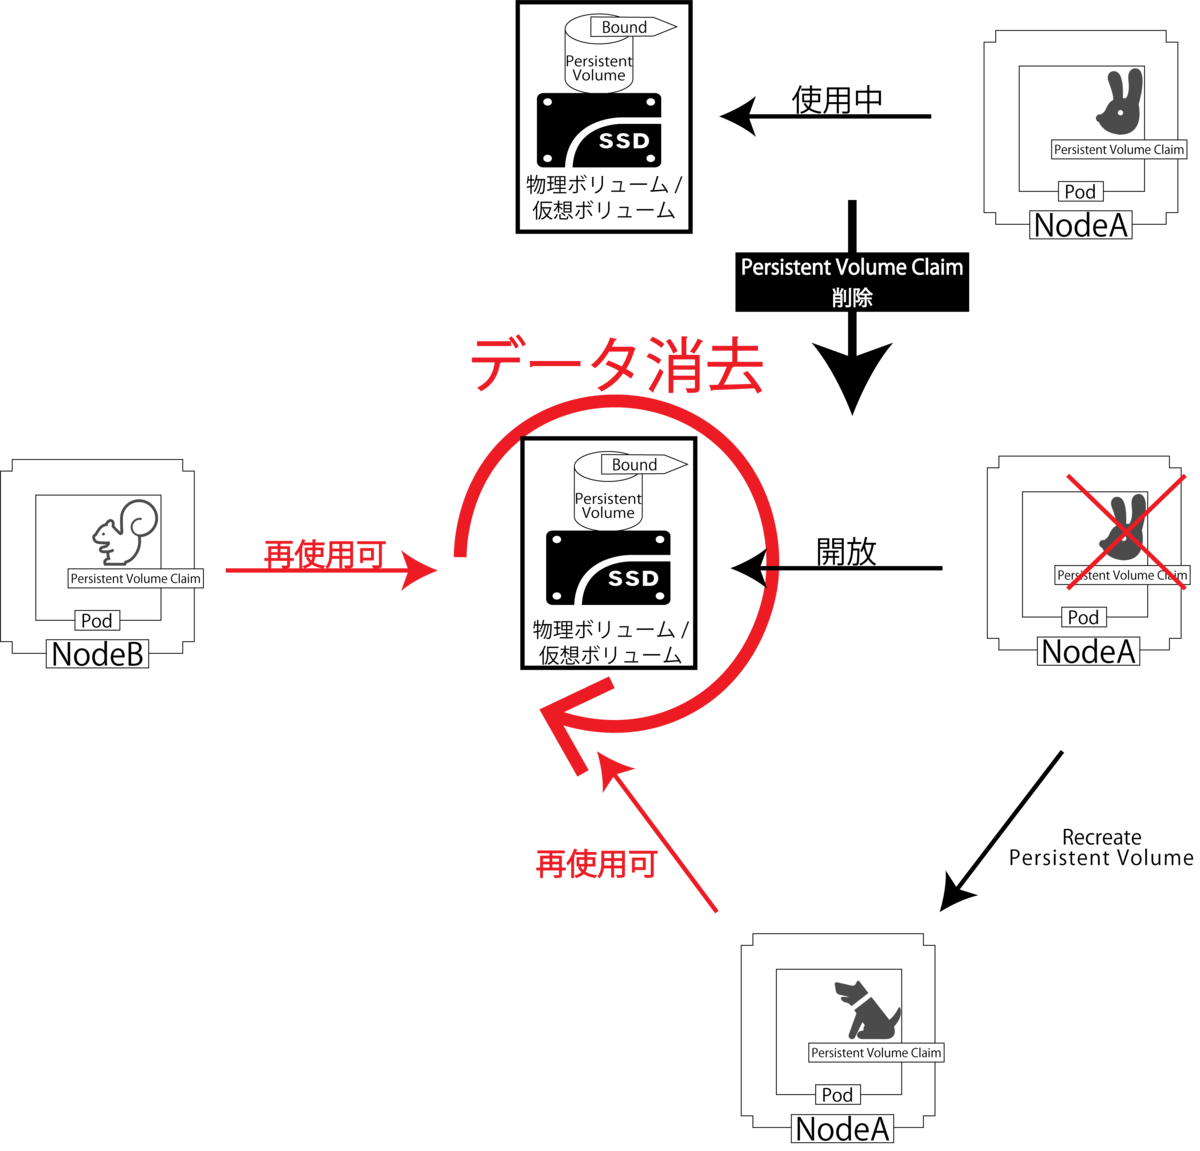
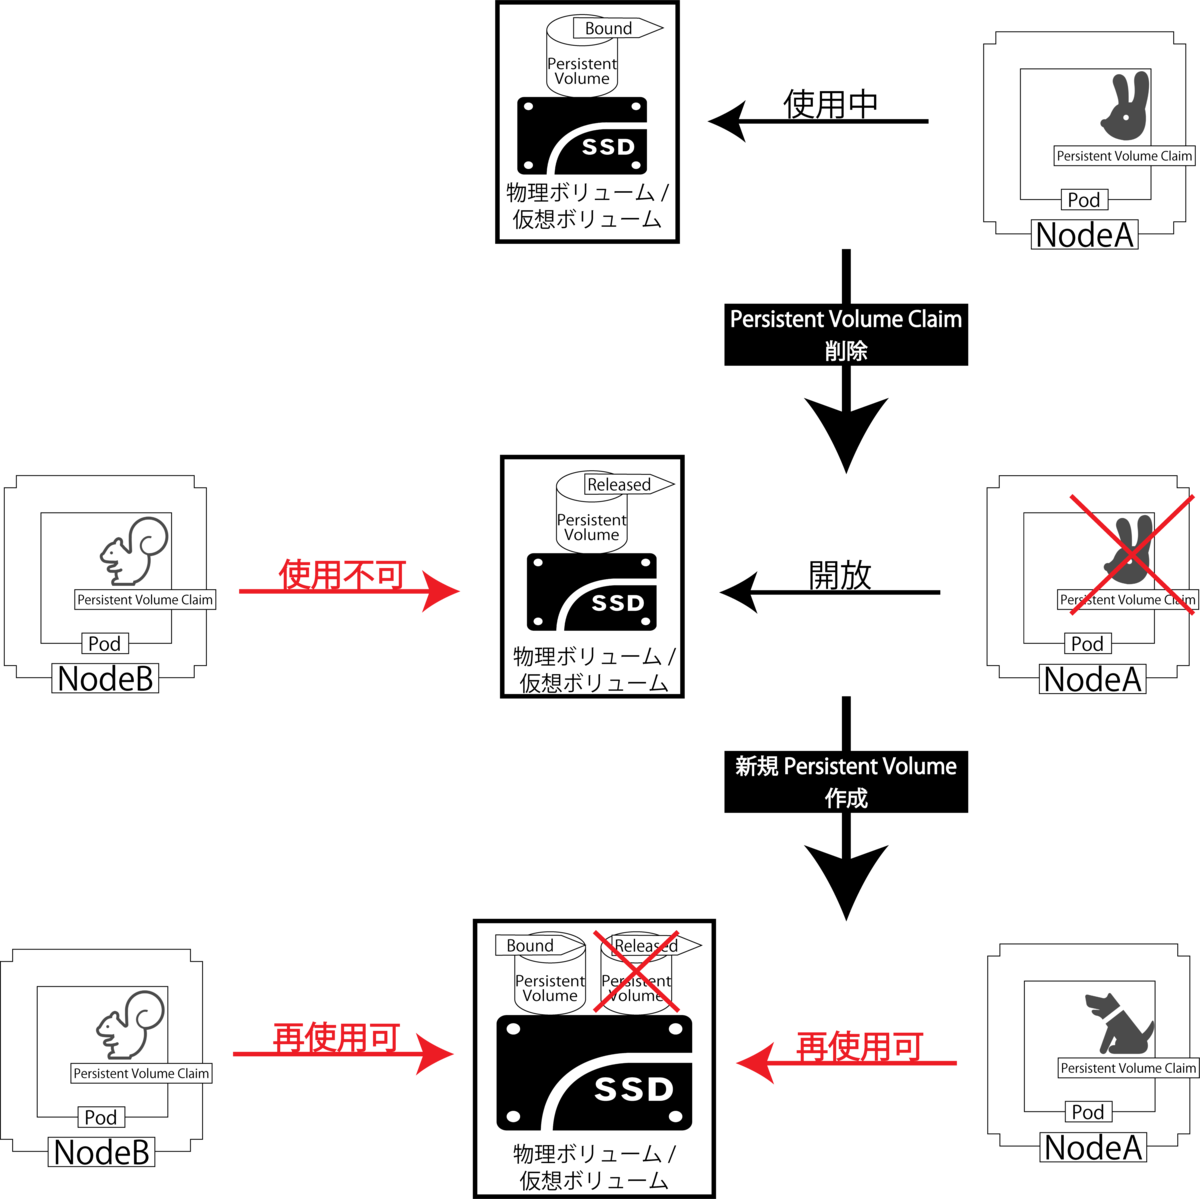
Reclaim PolicyではPersistent Volume Claim破棄後にPersistent Volumeをどのように扱うかの記述を行う場所です. 制御方法は以下の3パターンが用意されています.
- Delete
- Persistent Volume Claimが削除されるとPersistent Volume自体も削除されます.また,ディスク自体も削除されるため新たにPersistent Volume Claimを作成しても使用することはできません.
- Recycle
- Persistent Volume Claimが削除されてもPersistent Volumeは削除せず,ディスク上データの削除のみ行います.そのため再び他のPersistent Volume ClaimからPersistent Volumeの使用が可能になります.
- Retain
- Persistent Volume Claimが削除されるとPersistent Volumeは削除されますが,ディスク上データの削除は行われません.そのためこのままではPersistent Volumeがreleasedになっていて他のPersistent Volume Claimから使用することはできませんが,新たにPersistent Volumeを宣言して同領域を割り当てることによって他のPersistent Volume Claimから再使用することができます.
spec.nfs
ここではマウントするNFSサーバについて記述していきます. spec.nfs.serverにはNFSサーバのIPアドレスを記述してください. また,spec.nfs.pathにはマウントするNFSサーバ上のディレクトリを指定してください.
Persistent Volume Claimの作成
Persistent Volume Claimは先ほど作成したPersistent Volumeなどの永続化領域にたいして要求を行うものです. 今回は下記のような「persistent_volume_claims.yaml」を作成してください. 以下のマニフェストでは先ほど作成した3つのPersistent Volumeをそれぞれ呼び出すように記述しています.
apiVersion: v1
kind: PersistentVolumeClaim
metadata:
  name: test-claim01
spec:
  selector:
    matchLabels:
      environment: hdd
  accessModes:
    - ReadWriteOnce
  volumeMode: Filesystem
  storageClassName: manual
  resources:
    requests:
      storage: 1Gi
---
apiVersion: v1
kind: PersistentVolumeClaim
metadata:
  name: test-claim02
spec:
  selector:
    matchLabels:
      environment: ssd
  accessModes:
    - ReadWriteOnce
  volumeMode: Filesystem
  storageClassName: manual
  resources:
    requests:
      storage: 1Gi
---
apiVersion: v1
kind: PersistentVolumeClaim
metadata:
  name: test-claim03
spec:
  selector:
    matchLabels:
      environment: nvme
  accessModes:
    - ReadWriteOnce
  volumeMode: Filesystem
  storageClassName: manual
  resources:
    requests:
      storage: 1Gi
spec.selector.matchLabels
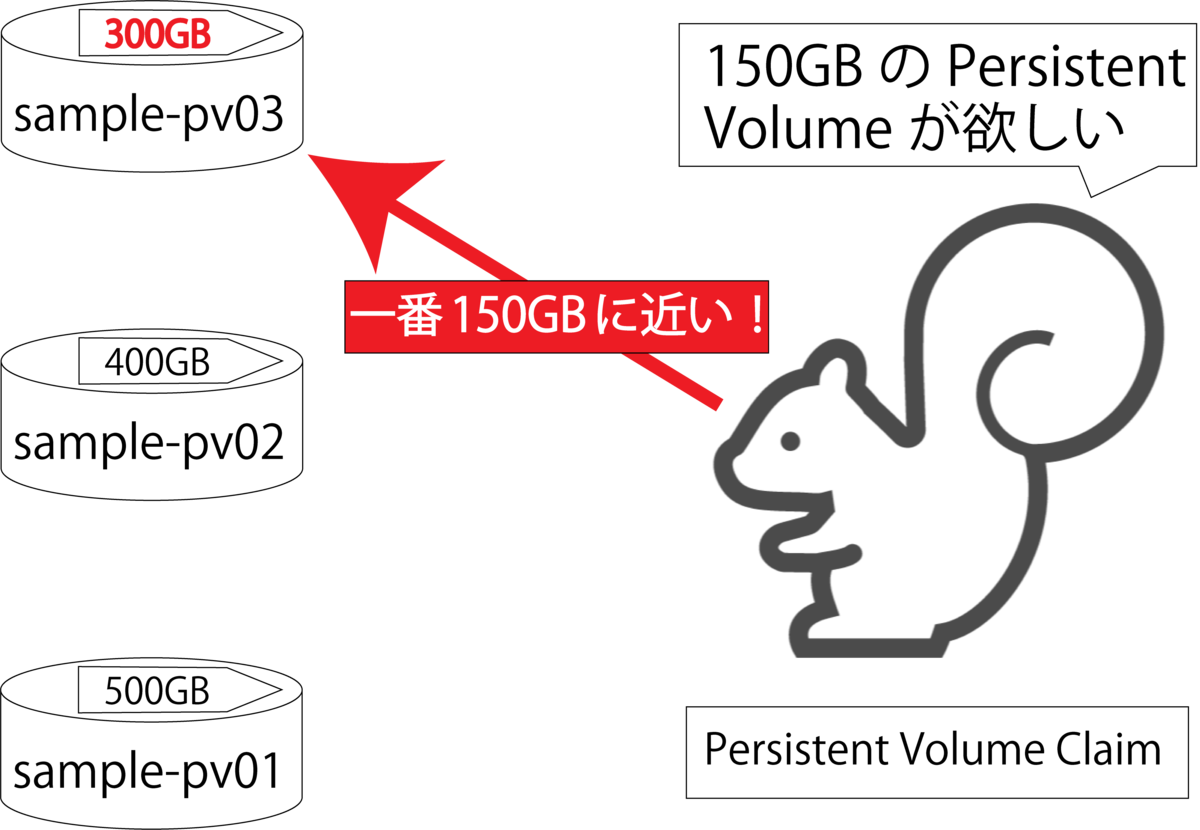
spec.selector.matchLabelsではPersistent Volumeでつけたラベルを記述することで,ラベルにマッチするPersistent Volumeを呼び出してくれます.上記の「test-claim01」では 「sample-pv01」を,「test-claim02」では「sample-pv02」を,「test-claim03」では「sample-pv03」を呼び出すようにPersistent Volume Claimのラベルを指定しています.
spec.resources.requests.storage
spec.resources.requests.storageでは,要求するPersistent Volumeの容量を記述します.例えばここで150GBを指定するとPersistent Volume Claimは最も近い容量である300GBを持ってる「sample-pv03」を確保します. このように指定した値の容量ではなく最も近い容量を確保するため,Persistent Volumeは様々な容量のものを用意しておきましょう.またDynamic Provisioning機能を使えば要求容量ぴったりのPersistent Volumeを確保することができますが,今回は使用しないので割愛します.
さらに今回はプラグインにnfsを使用しているため容量指定が機能しませんので, 適当に1GBと設定しています.
Deployment
先ほど作成したPersistent Volume Claimを使用してPod内にマウントした以下のようなDeployment「test-deployment.yaml」を作成します.Deploymentの原型は,Volumeのhostpathを使用してPart1で作成したもの使用します.(紫色の場所を削除し,水色の場所を追記してください.)
apiVersion: apps/v1
kind: Deployment
metadata:
  name: gpu-deployment
spec:
  replicas: 1
  selector:
    matchLabels:
      app: gpu-dlenv
  template:
    metadata:
      labels:
        app: gpu-dlenv
    spec:
      containers:
        - name: gpu-dlenv-container
          image: xxx.xxx.xxx.xxx:5000/k8s/dl_env:hoge

#デプロイするNodeにのみ存在するimageを使用する場合は下記を記述する.
#          imagePullPolicy: Never

          tty: true
          volumeMounts:
          - mountPath: /srv/sample01
-           name: host-share
+           name: pvc-volume01
          resources:
            limits:
              nvidia.com/gpu: 2 #GPUの個数を制限する.
      volumes:
-     - name: host-share
-       hostPath:
-         path: /host_hoge
-         type: DirectoryOrCreate
+     - name: pvc-volume01
+       persistentVolumeClaim:
+         claimName: test-claim01
+     restartPolicy: Always

#nodeを指定す場合は下記のように記述する.
#      nodeSelector:
#          type: <label名>
以上のマニフェストで「gpu-deployment」内にreplica数1で「gpu-dlenv-container」を作成し,コンテナ内のディレクトリ「/srv/sample01」に「pvc-volume01」としてPersistent Volume Claimの「test-claim01」をマウントしています. 次に,残りの2つのPersistent Volume Claimもコンテナ「gpu-dlenv-container」内にマウントしてみます. 先ほど作成したマニフェスト「test-deployment.yaml」に追加してください.(追加項目は水色になっています.)
apiVersion: apps/v1
kind: Deployment
metadata:
  name: gpu-deployment
spec:
  replicas: 1
  selector:
    matchLabels:
      app: gpu-dlenv
  template:
    metadata:
      labels:
        app: gpu-dlenv
    spec:
      containers:
        - name: gpu-dlenv-container
          image: xxx.xxx.xxx.xxx:5000/k8s/dl_env:hoge

#デプロイするNodeにのみ存在するimageを使用する場合は下記を記述する.
#          imagePullPolicy: Never

          tty: true
          volumeMounts:
          - mountPath: /srv/sample01
            name: pvc-volume01
+         - mountPath: /srv/sample02
+           name: pvc-volume02
+         - mountPath: /srv/sample03
+           name: pvc-volume03
          resources:
            limits:
              nvidia.com/gpu: 2 #GPUの個数を制限する.
      volumes:
      - name: pvc-volume01
        persistentVolumeClaim:
          claimName: test-claim01
+     - name: pvc-volume02
+       persistentVolumeClaim:
+         claimName: test-claim02
+     - name: pvc-volume03
+       persistentVolumeClaim:
+         claimName: test-claim03
      restartPolicy: Always

#nodeを指定す場合は下記のように記述する.
#      nodeSelector:
#          type: <label名>
デプロイ
実装
以下のコマンドを実行して作成したPersistent Volume,Persistent Volume Claim,Deploymentをデプロイします.デプロイしたPersistent Volumeを確認してみると,正常に3つともStatusがBoundになっていることがわかります.同様にPersistent Volume Claimも3つ正常に起動されていることがわかります. また作成したPodの情報を表示してみると,PVCが正常にマウントされて起動されていることがわかります.
$ kubectl apply -f sample_persistent_volume.yaml
persistentvolume/sample-pv01 created
persistentvolume/sample-pv02 created
persistentvolume/sample-pv03 created
$
$ kubectl apply -f persistent_volume_claims.yaml
persistentvolumeclaim/test-claim01 created
persistentvolumeclaim/test-claim02 created
persistentvolumeclaim/test-claim03 created
$
$ kubectl apply -f test-deployment.yaml
deployment.apps/gpu-deployment-remote created
$
$ kubectl get pv
NAME          CAPACITY   ACCESS MODES   RECLAIM POLICY   STATUS   CLAIM                  STORAGECLASS   REASON   AGE
sample-pv01   500Gi      RWO            Retain           Bound    default/test-claim01   manual                  10s
sample-pv02   400Gi      RWO            Retain           Bound    default/test-claim02   manual                  10s
sample-pv03   300Gi      RWO            Retain           Bound    default/test-claim03   manual                  10s
$
$kubectl get pvc
NAME           STATUS   VOLUME        CAPACITY   ACCESS MODES   STORAGECLASS   AGE
test-claim01   Bound    sample-pv01   500Gi      RWO            manual         9s
test-claim02   Bound    sample-pv02   400Gi      RWO            manual         9s
test-claim03   Bound    sample-pv03   300Gi      RWO            manual         9s
$
$ kubectl get pods
NAME                                    READY   STATUS    RESTARTS   AGE
gpu-deployment-remote-d49ff6565-bzzzk   1/1     Running   0          93s
$
$ kubectl describe pods
Name:         gpu-deployment-d49ff6565-bzzzk
Namespace:    default
Priority:     0
Node:         utaha/xxx.xxx.xxx.xxx
Start Time:   Wed, 11 Dec 2019 17:57:49 +0900
Labels:       app=gpu-dlenv
              pod-template-hash=d49ff6565
Annotations:  <none>
Status:       Running
IP:           10.244.1.53
IPs:
  IP:           10.244.1.53
Controlled By:  ReplicaSet/gpu-deployment-d49ff6565
Containers:
  gpu-dlenv-container:
    Container ID:   docker://6ec592f048c0a50358b64df2eda7c76c1cd5a524d23add7c72790bdbc7efbcd8
    Image:          xxx.xxx.xxx.xxx:5000/k8s/dl_env:hoge
    Image ID:       docker-pullable://xxx.xxx.xxx.xxx:5000/k8s/dl_env@sha256:c7be5ffa7f6c04e3a0ace7c334bf889ddc071f318c4618298d40b5132662e1de
    Port:           <none>
    Host Port:      <none>
    State:          Running
      Started:      Wed, 11 Dec 2019 17:57:51 +0900
    Ready:          True
    Restart Count:  0
    Limits:
      nvidia.com/gpu:  1
    Requests:
      nvidia.com/gpu:  1
    Environment:       <none>
    Mounts:
      /srv/sample01 from pvc-volume01 (rw)
      /srv/sample02 from pvc-volume02 (rw)
      /srv/sample03 from pvc-volume03 (rw)
      /var/run/secrets/kubernetes.io/serviceaccount from default-token-bsgjw (ro)
Conditions:
  Type              Status
  Initialized       True
  Ready             True
  ContainersReady   True
  PodScheduled      True
Volumes:
  pvc-volume01:
    Type:       PersistentVolumeClaim (a reference to a PersistentVolumeClaim in the same namespace)
    ClaimName:  test-claim01
    ReadOnly:   false
  pvc-volume02:
    Type:       PersistentVolumeClaim (a reference to a PersistentVolumeClaim in the same namespace)
    ClaimName:  test-claim02
    ReadOnly:   false
  pvc-volume03:
    Type:       PersistentVolumeClaim (a reference to a PersistentVolumeClaim in the same namespace)
    ClaimName:  test-claim03
    ReadOnly:   false
  default-token-bsgjw:
    Type:        Secret (a volume populated by a Secret)
    SecretName:  default-token-bsgjw
    Optional:    false
QoS Class:       BestEffort
Node-Selectors:  <none>
Tolerations:     node.kubernetes.io/not-ready:NoExecute for 300s
                 node.kubernetes.io/unreachable:NoExecute for 300s
Events:
  Type    Reason     Age        From               Message
  ----    ------     ----       ----               -------
  Normal  Scheduled  <unknown>  default-scheduler  Successfully assigned default/gpu-deployment-d49ff6565-bzzzk to utaha
  Normal  Pulled     4m27s      kubelet, utaha     Container image "xxx.xxx.xxx.xxx:5000/k8s/dl_env_remote:hoge" already present on machine
  Normal  Created    4m27s      kubelet, utaha     Created container gpu-dlenv-container
  Normal  Started    4m26s      kubelet, utaha     Started container gpu-dlenv-container
確認
実際にコンテナへ擬似ログインしてマウントされているか確認します.
$ kubectl exec -it gpu-deployment-d49ff6565-bzzzk /bin/bash
root@gpu-deployment-d49ff6565-bzzzk:/# ls
bin  boot  dev  etc  home  lib  lib64  media  mnt  opt  proc  root  run  sbin  srv  sys  tmp  usr  var
root@gpu-deployment-d49ff6565-bzzzk:/#
root@gpu-deployment-d49ff6565-bzzzk:/#cd ./srv
root@gpu-deployment-d49ff6565-bzzzk:/srv# ls
sample01  sample02  sample03
マウントできていることがわかります.次にそれぞれのボリューム内で適当なテキストファイルを作って実際NFSサーバ内に作成されるか確認します.以下でまずコンテナ内で適当なファイルを作成します.
root@gpu-deployment-d49ff6565-bzzzk:/srv# touch ./sample01/01.txt
root@gpu-deployment-d49ff6565-bzzzk:/srv# touch ./sample02/02.txt
root@gpu-deployment-d49ff6565-bzzzk:/srv# touch ./sample03/03.txt
root@gpu-deployment-d49ff6565-bzzzk:/srv# ls sample01
01.txt
root@gpu-deployment-d49ff6565-bzzzk:/srv# ls sample02
02.txt
root@gpu-deployment-d49ff6565-bzzzk:/srv# ls sample03
03.txt
root@gpu-deployment-d49ff6565-bzzzk:/srv# exit
次にnfsサーバをホストマシンにマウントして,反映されているか直接確認します.「xxx.xxx.xxx.xxx」にはnfsサーバのIPアドレスを指定してください. また「:」以下にはマウントするnfsサーバのディレクトリを記述してください.
$ cd /mnt/
$ sudo mount -t nfs xxx.xxx.xxx.xxx :/data/workspace/tenzen/k8s/test_volume/
$
$ ls -R
.:
sample01  sample02  sample03

./sample01:
01.txt

./sample02:
02.txt

./sample03:
03.txt
Persistent Volumeのマウントの確認とデータ同期の確認ができたので次にPodを削除して動作を見てみます.
$ kubectl delete -f test_deployment.yaml
deployment.apps "gpu-deployment" deleted
$
$ cd /mnt/
$ ls -R
.:
sample01  sample02  sample03

./sample01:
01.txt

./sample02:
02.txt

./sample03:
03.txt
次にPersistent VolumeとPersistent Volume Claimの削除も行います.
$ kubectl delete -f persistent_volume_claims.yaml
persistentvolumeclaim "test-claim01" deleted
persistentvolumeclaim "test-claim02" deleted
$
$ kubectl delete -f persistent_volume.yaml
persistentvolume "sample-pv01" deleted
persistentvolume "sample-pv02" deleted
persistentvolume "sample-pv03" deleted
$
$ kubectl get pv
No resources found in default namespace.
$
$ kubectl get pvc
No resources found in default namespace.
nfsサーバの中にはいって確認してみます.
$ cd /mnt/
$
$ ls -R
.:
sample01  sample02  sample03

./sample01:
01.txt

./sample02:
02.txt

./sample03:
03.txt
Reclaim PolicyをRetainにセットしているのでちゃんとデータが保持されていることがわかると思います.
リモート開発環境の構築
概略
Microsoft VSCodeを使用してKubernetes内コンテナ内でリモート開発環境を構築していきます. ローカルマシンにはMacBookPro 13インチ 2018Lateモデルを使用しています.
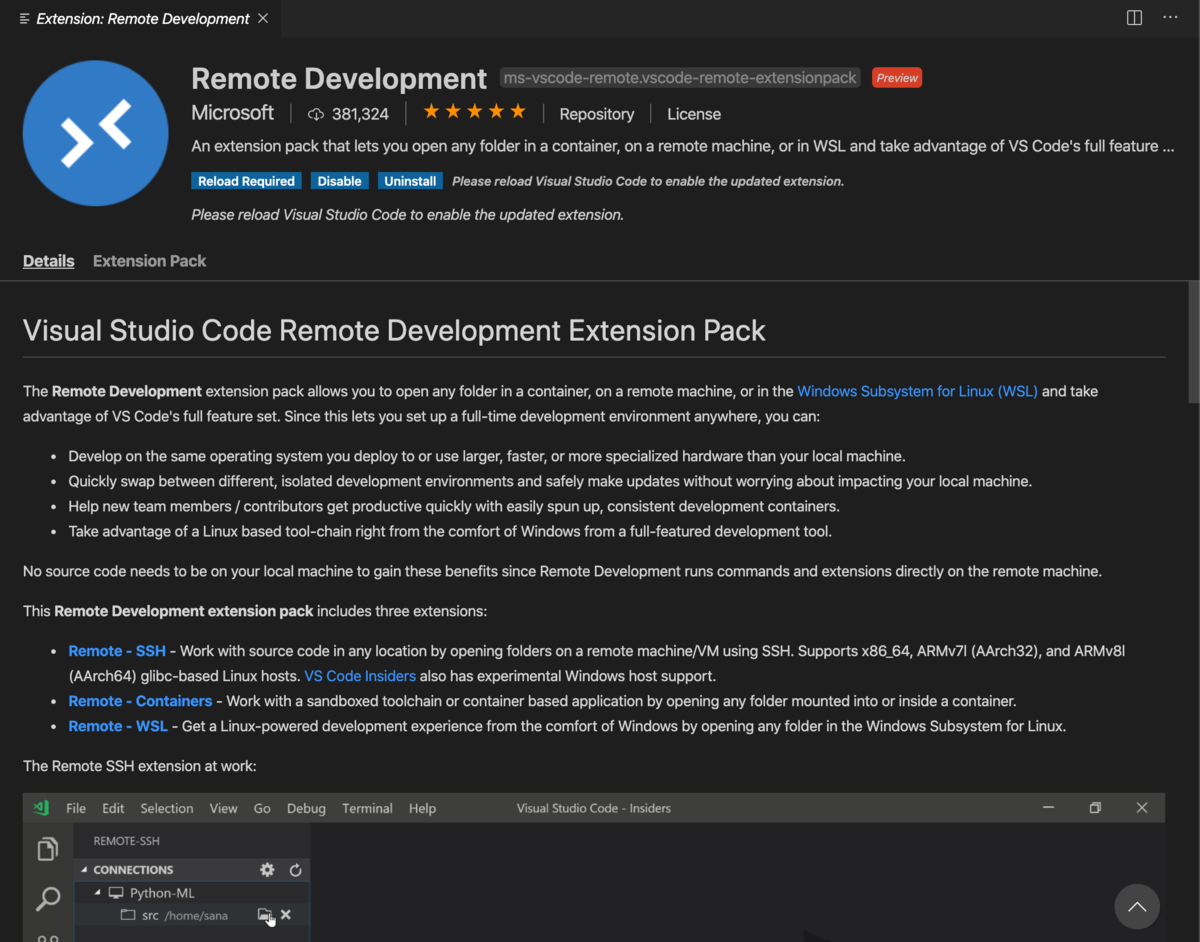
事前にVSCodeをインストールしておいてください. VSCodeがインストールできたら以下のような「Remote Development」拡張ツールをインストールします.
リモート開発環境の構築では,以下の記事を参考にしました. この記事ではサーバマシンのDockerコンテナにアクセスする際にサーバホストを踏み台としてコンテナにsshログインしています. これをKubernetes Cluster上で行います.
今回は下図のようにクライアントマシンからKubernetes Masterホストを踏み台としてKubernetes Clusterにアクセスし,そこから目的のコンテナ内にsshログインします.

リモート開発環境用DeepLearning環境DockerImageの作成
今回は前回のPart1の記事で作成したDockerFileを改変してリモートアクセスできる以下のようなDockerFileを作成します.
また,そのままではリモートアクセスする際bashファイルなどがコピーされずパスが通らないので,強引にPythonへパスを通します.
FROM nvidia/cuda:10.0-cudnn7-devel-ubuntu16.04

#preparation
RUN apt-get update
RUN apt-get install -y curl wget git unzip imagemagick bzip2 vim
RUN git clone https://github.com/pyenv/pyenv.git .pyenv

WORKDIR /
ENV HOME  /
ENV PYENV_ROOT /.pyenv
ENV PATH $PYENV_ROOT/shims:$PYENV_ROOT/bin:$PATH

RUN pyenv install anaconda3-4.4.0
RUN pyenv global anaconda3-4.4.0
RUN pyenv rehash

RUN pip install --upgrade pip
RUN apt-get update && apt-get install -y libsm6
RUN pip install opencv-python==3.4.7.28
RUN pip install tensorflow-gpu==1.13.1 --ignore-installed --user
RUN pip install keras
RUN pip install torch torchvision && apt-get install -y libgl1-mesa-dev
RUN pip install tqdm
RUN pip install torchsummary
RUN pip install progressbar

RUN apt-get update && apt-get install -y openssh-server
RUN mkdir /var/run/sshd
RUN echo 'root:パスワード' | chpasswd
RUN sed -i 's/PermitRootLogin prohibit-password/PermitRootLogin yes/' /etc/ssh/sshd_config
RUN sed 's@session\s*required\s*pam_loginuid.so@session optional pam_loginuid.so@g' -i /etc/pam.d/sshd
ENV NOTVISIBLE "in users profile"
RUN echo "export VISIBLE=now" >> /etc/profile
EXPOSE 22

RUN echo "export HOME=/"  >> /etc/environment
RUN echo "export PYENV_ROOT=/.pyenv"  >> /etc/environment
RUN echo "if [ -f ~/.bashrc ]; then  . ~/.bashrc;  fi" >>~/.bash_profile
RUN echo "PATH=${PATH}:$PYENV_ROOT/shims:$PYENV_ROOT/bin" >> ~/.bashrc

CMD ["/usr/sbin/sshd", "-D"]
今回はパスワード認証でsshログインします.DockerFile中の「RUN echo 'root:パスワード' | chpasswd」のパスワードの部分は任意のパスワードを設定してください.
「RUN echo "export HOME=/" >> /etc/environment」から「"PATH=${PATH}:$PYENV_ROOT/shims:$PYENV_ROOT/bin" >> ~/.bashrc 」まででパスを通しています.前回のDockerFileを使用しない場合は適宜パスを通し直してください.
以下のコマンドを実行してDockerイメージをビルドし,Private Docker Registryにプッシュします.Private Docker Registryの建て方などは以下を参考にしてください.
$ sudo docker build -t dl_env_remote .
$
$ sudo docker tag dl_env_remote:latest xxx.xxx.xxx.xxx:5000/k8s/dl_env_remote:hoge
$ sudo docker push xxx.xxx.xxx.xxx:5000/k8s/dl_env_remote:hoge
ssh設定
まずはじめに図12のようなVScode左下にある緑色のボタンを押して,図13のポップアップを出します.

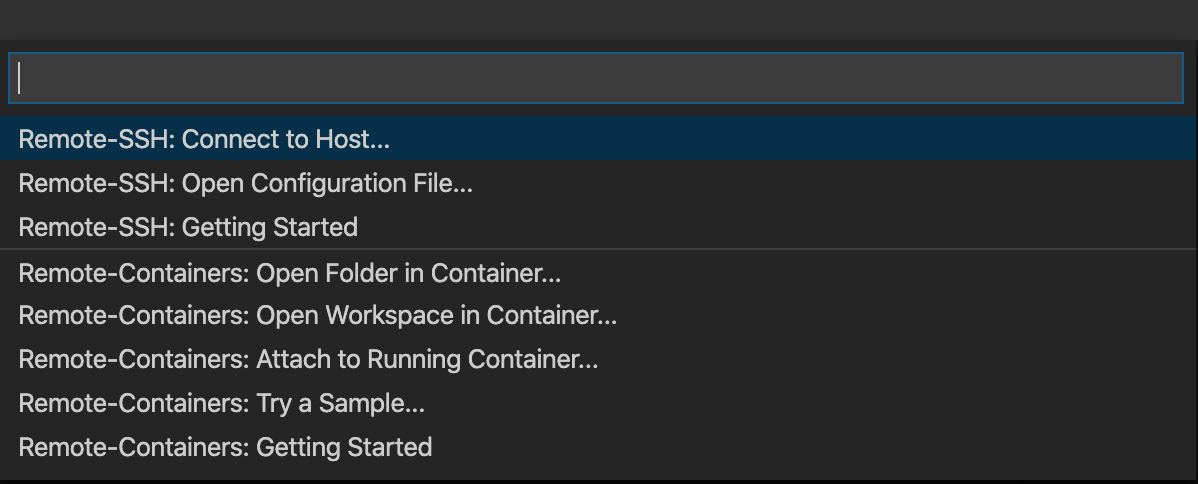
ポップアップが出たら上から二段目の「Remote-SSH: Open Configuration File」を選択します.
次に一番上の「Users/hoge/.ssh/config」を選択します.

以下のコマンドを実行して接続するPodのIPアドレスを探してきます.KubernetesのPod内コンテナはポート制御によりネットワークが構成されているため同一Pod内のコンテナは同一IPアドレスが割り振られています.しかしKubernetesではサブプロセスを走らせるコンテナがある場合など一部の例外をのぞいて,1Podに1コンテナが原則のため今回はその原則に従い,PodのIPアドレスの22番ポートに接続することでコンテナへのsshを可能にします.

$ kubectl get pods -owide
NAME                                    READY   STATUS    RESTARTS   AGE    IP            NODE    NOMINATED NODE   READINESS GATES
gpu-deployment-remote-d49ff6565-69dvm   1/1     Running   0          4d1h   10.244.1.7    utaha   <none>           <none>
例では「10.244.1.7」がデプロイしたPodのIPアドレスになるので,sshのconfigを以下のように設定します.
Host k8s_Master
# Kubernetes Cluster Master IP address.
  Hostname xxx.xxx.xxx.xxx
  User k8s-m

Host test_worker
  Hostname 10.244.1.7
  User root
  ProxyCommand ssh -W %h:%p k8s_Master
完了したら図13の「Remote-SSH: Connect to Host...」を選択して,先ほど作成した「test_worker」を選択します.
接続できたら拡張機能でコンテナ内にPythonの拡張機能をインストールしてください.うまくいかない場合reloadを繰り返すとうまくいくことがあります. 以上でリモート開発環境の構築は完了です.
死活監視システムの構築
今回はKubernetes Cluster上にPrometheusとGrafanaを展開して死活監視を行います.Prometheusの方ではPrometheus Operatorを使用し,NodeExporterとDCGM(Data Center GPU Manager)Exporterを使用して行きます. Prometheusの実際の導入事例などがPrometheus MeetUpで発表されているのですが,以下のサイトでその資料がまとめられているので必ず読みましょう.かなり勉強になります.
Prometheus
PrometheusとはCNCFでGraduatedプロジェクトに認定されているモニタリングシステムのことです.またこの章は以下の書籍を参考にしました.

入門 Prometheus ―インフラとアプリケーションのパフォーマンスモニタリング
- 作者:Brian Brazil
- 出版社/メーカー: オライリージャパン
- 発売日: 2019/05/18
- メディア: 単行本(ソフトカバー)
PrometheusはPull型の監視アプリケーションです.そのためPrometheus側が監視対象サーバにメトリクスを取得しに行きます.スクレイプするターゲットはPrometheusがサービスディスカバリで見つけてきます. 取得方法は大きく分けて二種類あり,ダイレクトインストルメンテーションによってアプリケーションに埋め込まれたクライアントライブラリがPrometheusで受け取ることができる形式に合わせて生成したメトリクスを取得する方法と,ダイレクトインストルメンテーションできないアプリケーションの場合にexporterをデプロイする形式があります.exporterはPrometheusからのPull命令を受け取り,アプリケーションへメトリクスを取得しに行きます.その後受け取ったメトリクスをPrometheusが扱える形式に変換した後Prometheusにメトリクスを渡す役割をはたしいています.
Prometheusは受け取ったメトリクスをAlertManagerなどの警告ツールへ受け渡したり,Grafanaなどの可視化ツールがデータリソースとしてPromethesu側へ情報を取りに行きます.

Prometheus Operator
Prometheus Operatorとは文字通りPrometheusをOperatorに使用して展開するものです. またPrometheus Operatorについては以下の書籍と記事を参考にしました.
Operator
Kubernetesでは前回の記事で作成した深層学習環境のDeploymentのようにステートレスなアプリケーションが推奨されてきました.しかしデータベースなどステートフルにした方が扱いやすいアプリケーションがあることも確かであるためKuberneteではStatefulSetが用意されています.Statefulの機能に運用のノウハウ自体を自動化するNoOpsという考え方をミックスしたものがOperatorです.
Prometheus Operator
Prometheus Operatorは前述したPrometheusとOperatorを融合したものであり,ステートフルにPrometheusを比較的用意にデプロイできるようにしたものです.Prometheus OperatorはPrometheusの設定情報を常に監視し,変更があった場合には最新の設定を反映させます.
DCGM
DCGM(Data Center GPU Manager)はnvidiaがGitHub上で公開しているサードパーティー製のexporterです.公式exporterとしてはnode exporterなどが有名ですが,DCGMを使用することでnode exporterでは取得できないNvidiaのGPU情報を取得することができるようになります.
Grafana
GrafanaはPrometheus専用のダッシュボード作成ツールではないですが,現在PrometheusではGrafanaを使用することが推奨されています.GrafanaはPrometheusをデータリソースとして使用することでPrometheusを強力に可視化することができます.今回はあまりGrafanaについては踏み込まず,簡単な表示のみを行っていきます.
実装
今回の死活監視の流れは図16のような構成をとります. node exporterではCPUやメモリ,ストレージIOなどの基本的なハードウェア情報を,DCGM exporterではGPUの情報を取得してきます.exporterが集めてきた情報をPrometheusが収集し,GrafanaがPrometheusにその情報を取りに行って可視化します.

まず準備としてGitHubのcoreosにあるkube-prometheusリポジトリから以下のコマンドを実行してPrometheus Operatorを取ってきます.
$ git clone https://github.com/coreos/kube-prometheus
次にNvidia製GPUを搭載しているNodeにのみexporterが展開されるように,Nvidia製GPUを搭載している全てのNodeにラベルをつけていきます.
$ kubectl label nodes utaha hardware-type=NVIDIAGPU
$ kubectl label nodes eriri hardware-type=NVIDIAGPU
$ kubectl label nodes megumi hardware-type=NVIDIAGPU
Serviceの実装
この章ではPrometheusとGrafanaのServiceを実装していきます. この章では基本的に全作業をMasterで行います.
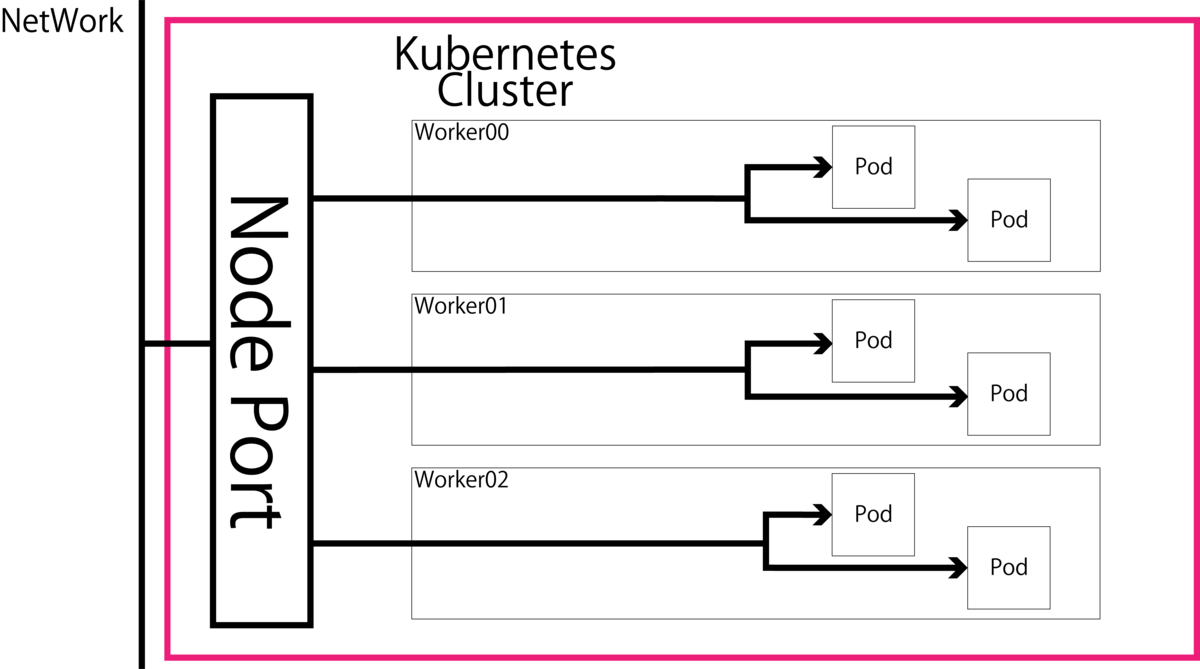
Prometheus OperatorにおけるServiceは「Cluster IP」・「NodePort」・「LoadBalancer」の三種類が使用可能です.
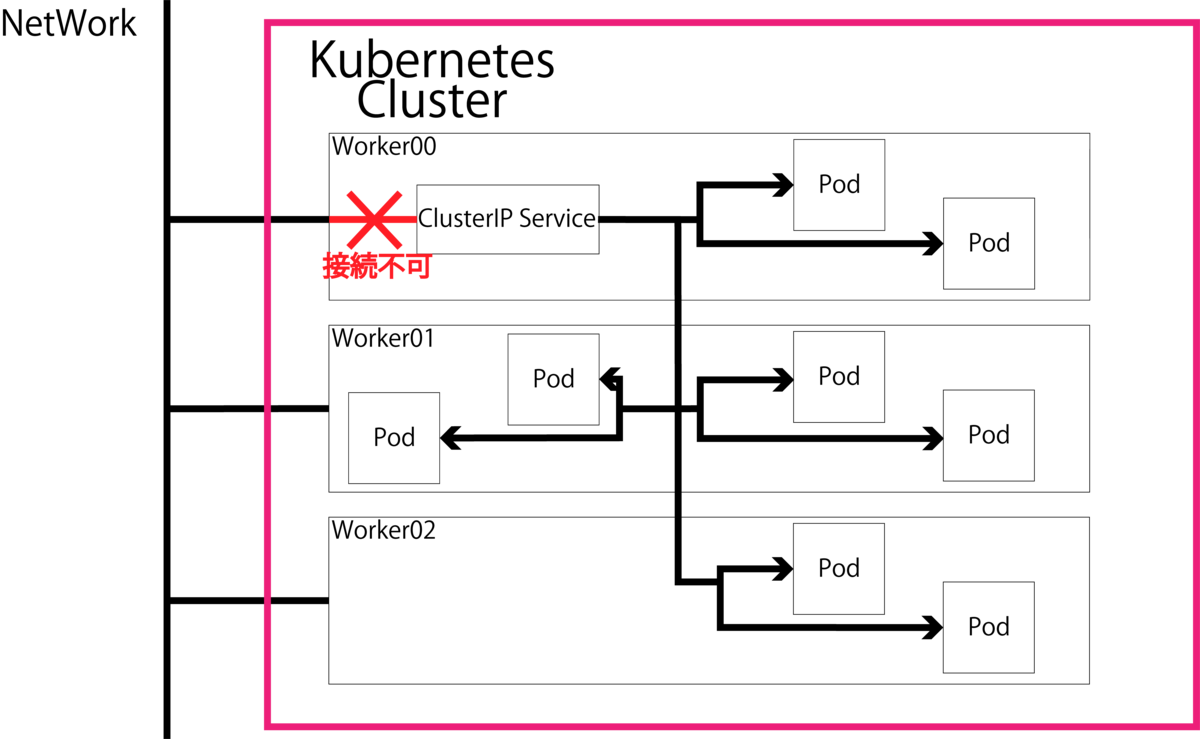
- Cluster IP
- Kubernetes Cluster内部でのみ通信可能な仮想IPが割り当てられます.そのためポートフォワーディングなどを行わない限りKubernete Cluster外との通信はできません.
- Node Port
- クラスタ内に作られたNodePortが全ての「Kubernetes Node IP:Service Port」を受信し,各Podへ通信を転送します.Kubernetes Cluster外との通信ができますが,NodePortはKubernetes Cluster内のどこかのNodeに作られてそこで通信を捌くためそのノードを障害を起こしてしまうと通信ができなくなってしまい,単一障害点となってしまうデメリットもあります.
- LoadBalancer
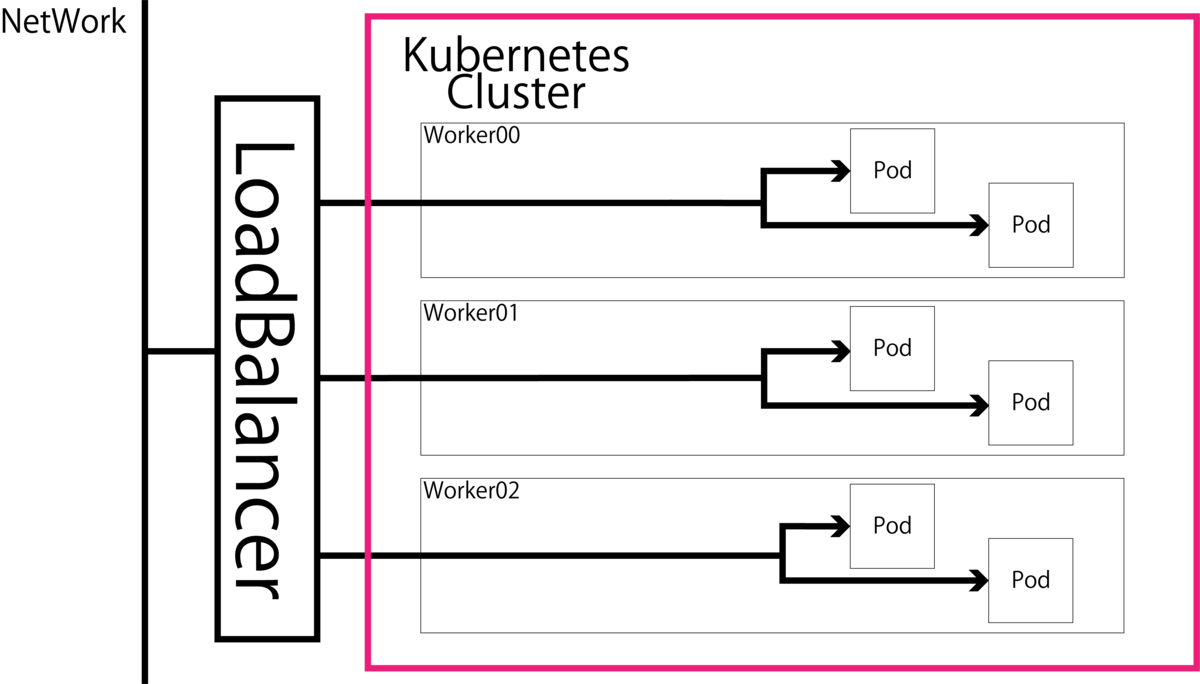
今回Prometheus OperatorとGrafanaのServiceはデフォルトでCluster IPが使用されていますが,今回はNode Portを使用してKubernetes Cluster外部からでもアクセスしやすいように設計します. 以下のように取得してきたファイルの
「/kube-prometheus/manifests/prometheus-service.yaml」と
「/kube-prometheus/manifests/grafana-service.yaml」を以下のように書き換えます.
prometheus-service.yaml
apiVersion: v1
kind: Service
metadata:
  labels:
    prometheus: k8s
  name: prometheus-k8s
  namespace: monitoring
spec:
+ type: NodePort
  ports:
  - name: web
+   nodePort: 30900
    port: 9090
+   protocol: TCP
    targetPort: web
  selector:
    app: prometheus
    prometheus: k8s
-  sessionAffinity: ClientIP
+ #sessionAffinity: ClientIP
grafana-service.yaml
apiVersion: v1
kind: Service
metadata:
  labels:
    app: grafana
  name: grafana
  namespace: monitoring
spec:
+ type: NodePort
  ports:
  - name: http
+   nodePort: 30039
    port: 3000
+   protocol: TCP
    targetPort: http
  selector:
    app: grafana
これでNodePortを使用してKubernetes Cluster外部と通信ができるようになります.
DCGM exporterの実装
DCGM exporterをnode exporterの中に埋め込んでいきます.
DCGM exporteをnode exporterに埋め込んだマニフェストは以下のNvidia公式GitHubで公開されていますが,古すぎてKubernetes 1.16では動かず,1.16用のapi versionの書き換えても動きませんので注意してください.(ここでだいぶハマった.)
またNvidiaはKubernetesのパッケージ管理ツールHelmを用いたKubernetes Cluster上へのPrometheus Operatorの導入方法を公式ドキュメントで公開しています.しかしながらこちらもドキュメントの更新は最近まで行われていますが,そもそも元に使用されているPrometheus Operater のHelmのチャートが二年前のPormetheus Operatorのためapi versionなどを書き換えてもv1.16では動きませんでした.(ここでも更にハマった.)
https://nvidia.github.io/gpu-monitoring-tools/CHANGELOG.md
https://docs.nvidia.com/datacenter/dcgm/1.6/pdf/dcgm-user-guide.pdf
そのため本実装では最新版のPrometheus Operatorに含まれている node exporterにdcgm exporterを組み込み,DCGM exporterが拾ってきたGPUの情報を node exporterに拾ってもらうことでPrometheusに受け渡すことで実現させます.
先ほどと同じく取得してきた「/kube-prometheus/manifests/node-exporter-daemonset.yaml」を以下のように編集します.
node-exporter-daemonset.yaml
apiVersion: apps/v1
kind: DaemonSet
metadata:
  labels:
    app: node-exporter
  name: node-exporter
  namespace: monitoring
spec:
  selector:
    matchLabels:
      app: node-exporter
  template:
    metadata:
      labels:
        app: node-exporter
    spec:
+     affinity:
+       nodeAffinity:
+         requiredDuringSchedulingIgnoredDuringExecution:
+           nodeSelectorTerms:
+           - matchExpressions:
+              - key: hardware-type
+                operator: In
+                values:
+                - NVIDIAGPU
      containers:
      - args:
        - --web.listen-address=127.0.0.1:9100
        - --path.procfs=/host/proc
        - --path.sysfs=/host/sys
        - --path.rootfs=/host/root
        - --collector.filesystem.ignored-mount-points=^/(dev|proc|sys|var/lib/docker/.+)($|/)
        - --collector.filesystem.ignored-fs-types=^(autofs|binfmt_misc|cgroup|configfs|debugfs|devpts|devtmpfs|fusectl|hugetlbfs|mqueue|overlay|proc|procfs|pstore|rpc_pipefs|securityfs|sysfs|tracefs)$
+       - --collector.textfile.directory=/run/prometheus
        image: quay.io/prometheus/node-exporter:v0.18.1
        name: node-exporter
        resources:
          limits:
            cpu: 250m
            memory: 180Mi
          requests:
            cpu: 102m
            memory: 180Mi
        volumeMounts:
        - mountPath: /host/proc
          name: proc
          readOnly: false
        - mountPath: /host/sys
          name: sys
          readOnly: false
        - mountPath: /host/root
          mountPropagation: HostToContainer
          name: root
          readOnly: true
+       - mountPath: /run/prometheus
+         name: collector-textfiles
+         readOnly: true
      - args:
        - --logtostderr
        - --secure-listen-address=[$(IP)]:9100
        - --tls-cipher-suites=TLS_ECDHE_RSA_WITH_AES_128_GCM_SHA256,TLS_ECDHE_ECDSA_WITH_AES_128_GCM_SHA256,TLS_RSA_WITH_AES_128_CBC_SHA256,TLS_ECDHE_ECDSA_WITH_AES_128_CBC_SHA256,TLS_ECDHE_RSA_WITH_AES_128_CBC_SHA256
        - --upstream=http://127.0.0.1:9100/
        env:
        - name: IP
          valueFrom:
            fieldRef:
              fieldPath: status.podIP
        image: quay.io/coreos/kube-rbac-proxy:v0.4.1
        name: kube-rbac-proxy
        ports:
        - containerPort: 9100
          hostPort: 9100
          name: https
        resources:
          limits:
            cpu: 20m
            memory: 40Mi
          requests:
            cpu: 10m
            memory: 20Mi

+     - image: nvidia/dcgm-exporter:1.0.0-beta
+       name: nvidia-dcgm-exporter
+       securityContext:
+         runAsNonRoot: false
+         runAsUser: 0
+       volumeMounts:
+       - name: collector-textfiles
+         mountPath: /run/prometheus

      hostNetwork: true
      hostPID: true
      nodeSelector:
        kubernetes.io/os: linux
      securityContext:
        runAsNonRoot: true
        runAsUser: 65534
      serviceAccountName: node-exporter
      tolerations:
      - operator: Exists
      volumes:
      - hostPath:
          path: /proc
        name: proc
      - hostPath:
          path: /sys
        name: sys
      - hostPath:
          path: /
        name: root

+     - name: collector-textfiles
+       emptyDir:
+         medium: Memory
マニフェスト書き換えの意図を解説しておくと以下のようになります.
affinity:
   nodeAffinity:
     requiredDuringSchedulingIgnoredDuringExecution:
       nodeSelectorTerms:
       - matchExpressions:
         - key: hardware-type
           operator: In
           values:
           - NVIDIAGPU
上記の記述はnodeAffinityを用いてラベルhardware-typeがNVIDIAGPUのnodeのみにexporterを展開するように指定しています. requiredDuringSchedulingIgnoredDuringExecutionを使用しているため必須のスケジューリングポリシーとして指定することが可能です.
- --collector.textfile.directory=/run/prometheus
DCGN exporterは/run/prometheusにtextfile形式の取得してきたGPU情報を吐き出すため,node exporterにそれを回収してもらうためnode exporterに引数として記述しています.
- image: nvidia/dcgm-exporter:1.0.0-beta
docker hubからdcgm-exporterのバージョン1.0.0-betaを取得します.記事執筆時点では最新バージョンになります.
name: nvidia-dcgm-exporter
コンテナの名前を定義しています.
securityContext:
  runAsNonRoot: false
  runAsUser: 0
DCGM exporterがGPU情報を取得できるようにroot権限を与えています.
volumeMounts:
- name: collector-textfiles
  mountPath: /run/prometheus
取得してきたGPU情報を/run/prometheusに吐き出すように記述しています.
- name: collector-textfiles
  emptyDir:
    medium: Memory
GPU情報を吐き出す先のVolumeとしてhost領域をマウントしています.
デプロイ
必要なマニフェストは揃ったのでデプロイしていきます.
まず,以下を実行してPrometheus Operatorをデプロイします.
$ kubectl apply -f /kube-prometheus/manifests/setup
namespace/monitoring created
customresourcedefinition.apiextensions.k8s.io/alertmanagers.monitoring.coreos.com created
customresourcedefinition.apiextensions.k8s.io/podmonitors.monitoring.coreos.com created
customresourcedefinition.apiextensions.k8s.io/prometheuses.monitoring.coreos.com created
customresourcedefinition.apiextensions.k8s.io/prometheusrules.monitoring.coreos.com created
customresourcedefinition.apiextensions.k8s.io/servicemonitors.monitoring.coreos.com created
clusterrole.rbac.authorization.k8s.io/prometheus-operator created
clusterrolebinding.rbac.authorization.k8s.io/prometheus-operator created
deployment.apps/prometheus-operator created
service/prometheus-operator created
serviceaccount/prometheus-operator created
servicemonitor.monitoring.coreos.com/alertmanager created
$
$ kubectl get all -n monitoring
NAME                                      READY   STATUS    RESTARTS   AGE
pod/prometheus-operator-99dccdc56-57pc4   1/1     Running   0          42s

NAME                          TYPE        CLUSTER-IP   EXTERNAL-IP   PORT(S)    AGE
service/prometheus-operator   ClusterIP   None         <none>        8080/TCP   43s

NAME                                  READY   UP-TO-DATE   AVAILABLE   AGE
deployment.apps/prometheus-operator   1/1     1            1           43s

NAME                                            DESIRED   CURRENT   READY   AGE
replicaset.apps/prometheus-operator-99dccdc56   1         1         1       43s
次にPrometheusやGrafanaやnode exporterなどをデプロイしていきます.
$ kubectl apply -f manifests/
alertmanager.monitoring.coreos.com/main created
secret/alertmanager-main created
service/alertmanager-main created
serviceaccount/alertmanager-main created
secret/grafana-datasources created
configmap/grafana-dashboard-apiserver created
configmap/grafana-dashboard-cluster-total created
configmap/grafana-dashboard-controller-manager created
configmap/grafana-dashboard-k8s-resources-cluster created
configmap/grafana-dashboard-k8s-resources-namespace created
configmap/grafana-dashboard-k8s-resources-node created
configmap/grafana-dashboard-k8s-resources-pod created
configmap/grafana-dashboard-k8s-resources-workload created
configmap/grafana-dashboard-k8s-resources-workloads-namespace created
configmap/grafana-dashboard-kubelet created
configmap/grafana-dashboard-namespace-by-pod created
configmap/grafana-dashboard-namespace-by-workload created
configmap/grafana-dashboard-node-cluster-rsrc-use created
configmap/grafana-dashboard-node-rsrc-use created
configmap/grafana-dashboard-nodes created
configmap/grafana-dashboard-persistentvolumesusage created
configmap/grafana-dashboard-pod-total created
configmap/grafana-dashboard-pods created
configmap/grafana-dashboard-prometheus-remote-write created
configmap/grafana-dashboard-prometheus created
configmap/grafana-dashboard-proxy created
configmap/grafana-dashboard-scheduler created
configmap/grafana-dashboard-statefulset created
configmap/grafana-dashboard-workload-total created
configmap/grafana-dashboards created
deployment.apps/grafana created
service/grafana created
serviceaccount/grafana created
servicemonitor.monitoring.coreos.com/grafana created
clusterrole.rbac.authorization.k8s.io/kube-state-metrics created
clusterrolebinding.rbac.authorization.k8s.io/kube-state-metrics created
deployment.apps/kube-state-metrics created
role.rbac.authorization.k8s.io/kube-state-metrics created
rolebinding.rbac.authorization.k8s.io/kube-state-metrics created
service/kube-state-metrics created
serviceaccount/kube-state-metrics created
servicemonitor.monitoring.coreos.com/kube-state-metrics created
clusterrole.rbac.authorization.k8s.io/node-exporter created
clusterrolebinding.rbac.authorization.k8s.io/node-exporter created
daemonset.apps/node-exporter created
service/node-exporter created
serviceaccount/node-exporter created
servicemonitor.monitoring.coreos.com/node-exporter created
apiservice.apiregistration.k8s.io/v1beta1.metrics.k8s.io created
clusterrole.rbac.authorization.k8s.io/prometheus-adapter created
clusterrole.rbac.authorization.k8s.io/system:aggregated-metrics-reader created
clusterrolebinding.rbac.authorization.k8s.io/prometheus-adapter created
clusterrolebinding.rbac.authorization.k8s.io/resource-metrics:system:auth-delegator created
clusterrole.rbac.authorization.k8s.io/resource-metrics-server-resources created
configmap/adapter-config created
deployment.apps/prometheus-adapter created
rolebinding.rbac.authorization.k8s.io/resource-metrics-auth-reader created
service/prometheus-adapter created
serviceaccount/prometheus-adapter created
clusterrole.rbac.authorization.k8s.io/prometheus-k8s created
clusterrolebinding.rbac.authorization.k8s.io/prometheus-k8s created
servicemonitor.monitoring.coreos.com/prometheus-operator created
prometheus.monitoring.coreos.com/k8s created
rolebinding.rbac.authorization.k8s.io/prometheus-k8s-config created
rolebinding.rbac.authorization.k8s.io/prometheus-k8s created
rolebinding.rbac.authorization.k8s.io/prometheus-k8s created
rolebinding.rbac.authorization.k8s.io/prometheus-k8s created
role.rbac.authorization.k8s.io/prometheus-k8s-config created
role.rbac.authorization.k8s.io/prometheus-k8s created
role.rbac.authorization.k8s.io/prometheus-k8s created
role.rbac.authorization.k8s.io/prometheus-k8s created
prometheusrule.monitoring.coreos.com/prometheus-k8s-rules created
service/prometheus-k8s created
serviceaccount/prometheus-k8s created
servicemonitor.monitoring.coreos.com/prometheus created
servicemonitor.monitoring.coreos.com/kube-apiserver created
servicemonitor.monitoring.coreos.com/coredns created
servicemonitor.monitoring.coreos.com/kube-controller-manager created
servicemonitor.monitoring.coreos.com/kube-scheduler created
servicemonitor.monitoring.coreos.com/kubelet created
$
$ kubectl get all -n monitoring
NAME                                      READY   STATUS    RESTARTS   AGE
pod/alertmanager-main-0                   2/2     Running   0          10m
pod/alertmanager-main-1                   2/2     Running   0          10m
pod/alertmanager-main-2                   2/2     Running   0          10m
pod/grafana-58dc7468d7-p7csw              1/1     Running   0          10m
pod/kube-state-metrics-78b46c84d8-xj9ss   3/3     Running   0          10m
pod/node-exporter-hxvvh                   3/3     Running   0          10m
pod/node-exporter-xlptj                   3/3     Running   0          10m
pod/node-exporter-xlpz5                   3/3     Running   0          10m
pod/prometheus-adapter-5cd5798d96-d9l76   1/1     Running   0          10m
pod/prometheus-k8s-0                      3/3     Running   1          10m
pod/prometheus-k8s-1                      3/3     Running   1          10m
pod/prometheus-operator-99dccdc56-57pc4   1/1     Running   0          36m

NAME                            TYPE        CLUSTER-IP       EXTERNAL-IP   PORT(S)                      AGE
service/alertmanager-main       ClusterIP   10.102.232.189   <none>        9093/TCP                     10m
service/alertmanager-operated   ClusterIP   None             <none>        9093/TCP,9094/TCP,9094/UDP   10m
service/grafana                 NodePort    10.110.75.246    <none>        3000:30039/TCP               10m
service/kube-state-metrics      ClusterIP   None             <none>        8443/TCP,9443/TCP            10m
service/node-exporter           ClusterIP   None             <none>        9100/TCP                     10m
service/prometheus-adapter      ClusterIP   10.104.83.95     <none>        443/TCP                      10m
service/prometheus-k8s          NodePort    10.108.101.37    <none>        9090:30900/TCP               10m
service/prometheus-operated     ClusterIP   None             <none>        9090/TCP                     10m
service/prometheus-operator     ClusterIP   None             <none>        8080/TCP                     36m

NAME                           DESIRED   CURRENT   READY   UP-TO-DATE   AVAILABLE   NODE SELECTOR            AGE
daemonset.apps/node-exporter   3         3         3       3            3           kubernetes.io/os=linux   10m

NAME                                  READY   UP-TO-DATE   AVAILABLE   AGE
deployment.apps/grafana               1/1     1            1           10m
deployment.apps/kube-state-metrics    1/1     1            1           10m
deployment.apps/prometheus-adapter    1/1     1            1           10m
deployment.apps/prometheus-operator   1/1     1            1           36m

NAME                                            DESIRED   CURRENT   READY   AGE
replicaset.apps/grafana-58dc7468d7              1         1         1       10m
replicaset.apps/kube-state-metrics-78b46c84d8   1         1         1       10m
replicaset.apps/prometheus-adapter-5cd5798d96   1         1         1       10m
replicaset.apps/prometheus-operator-99dccdc56   1         1         1       36m

NAME                                 READY   AGE
statefulset.apps/alertmanager-main   3/3     10m
statefulset.apps/prometheus-k8s      2/2     10m
以上でデプロイは完了しました.node exporterがNVIDIA製GPU搭載nodeのみに展開されているかどうか確認してください.
ダッシュボードへのアクセス
実際にWEBページからPrometheusとGrafanaにアクセスして起動が成功しているかどうか確認していきます.
Prometheus
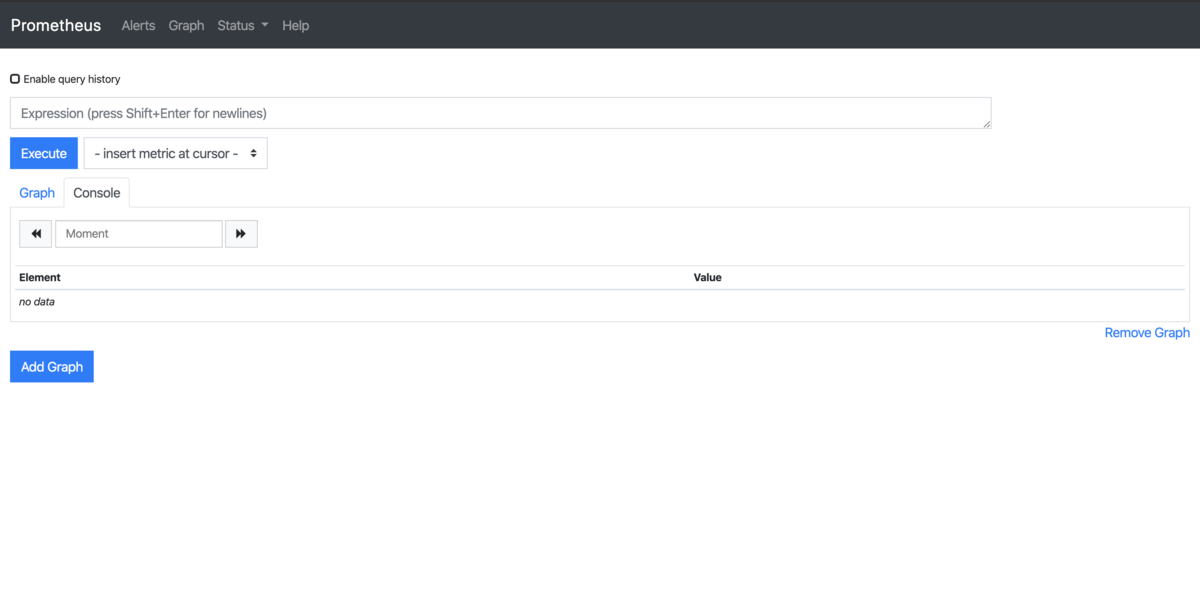
まずPrometheusを見てみます. ブラウザで「http://Master NodeのIPアドレス:30900」を入力してアクセスします. すると以下の図20のような画面が表示されます.
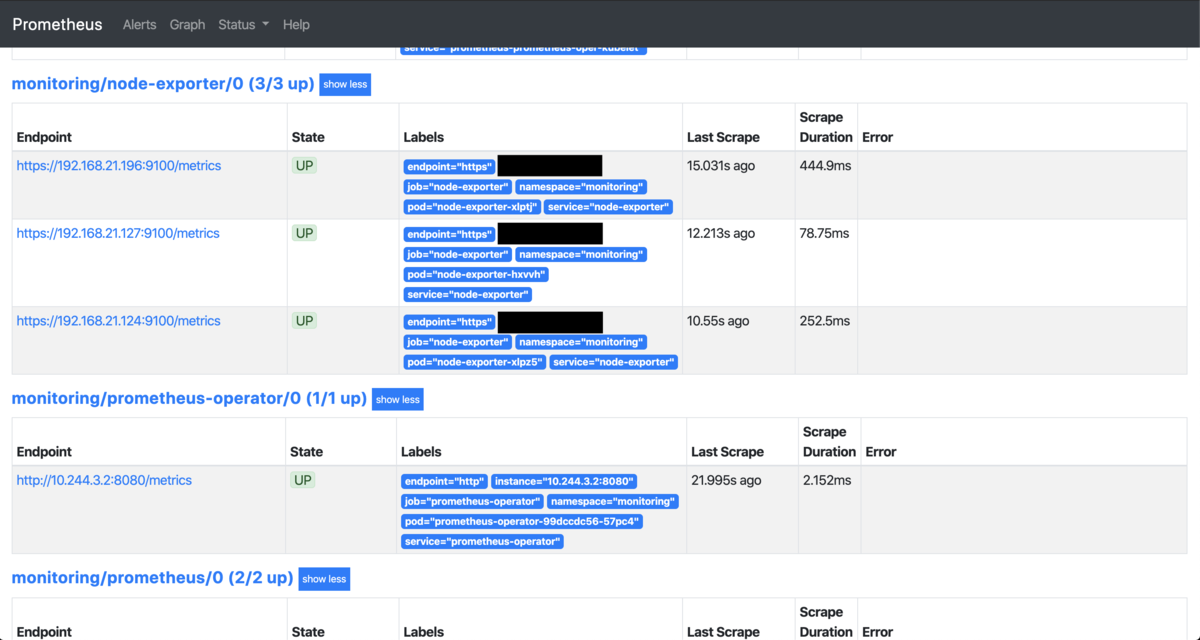
次に上部バーのStatus->Targetsを選択します.図21のように下の方へスクロールするとnode-exporterの表示があると思うのでエラーが出ずにステータスがUPになっていることを確認してください.
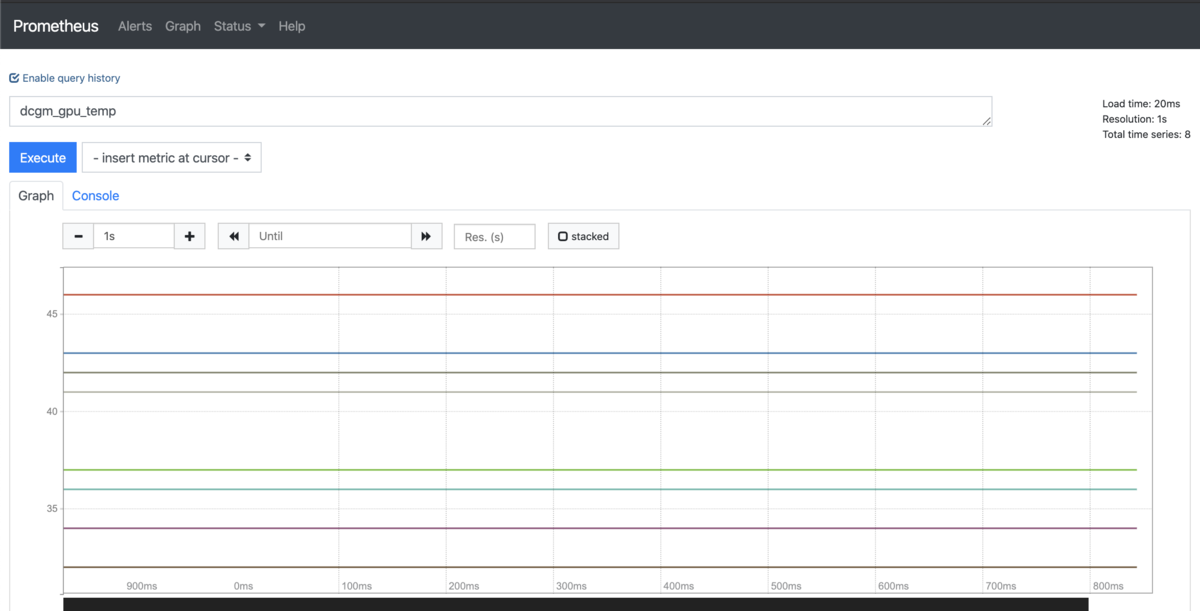
さらにGPUの温度グラフを表示してみます. 上部バーのGraphを選択して「Expression (pess Shift+Enter for newlines)」の部分に「dcgm_gpu_temp」と入力してExecuteボタンを押してください.その後Graphタブを選択すると図22のようなページが表示されるはずです.
Grafana
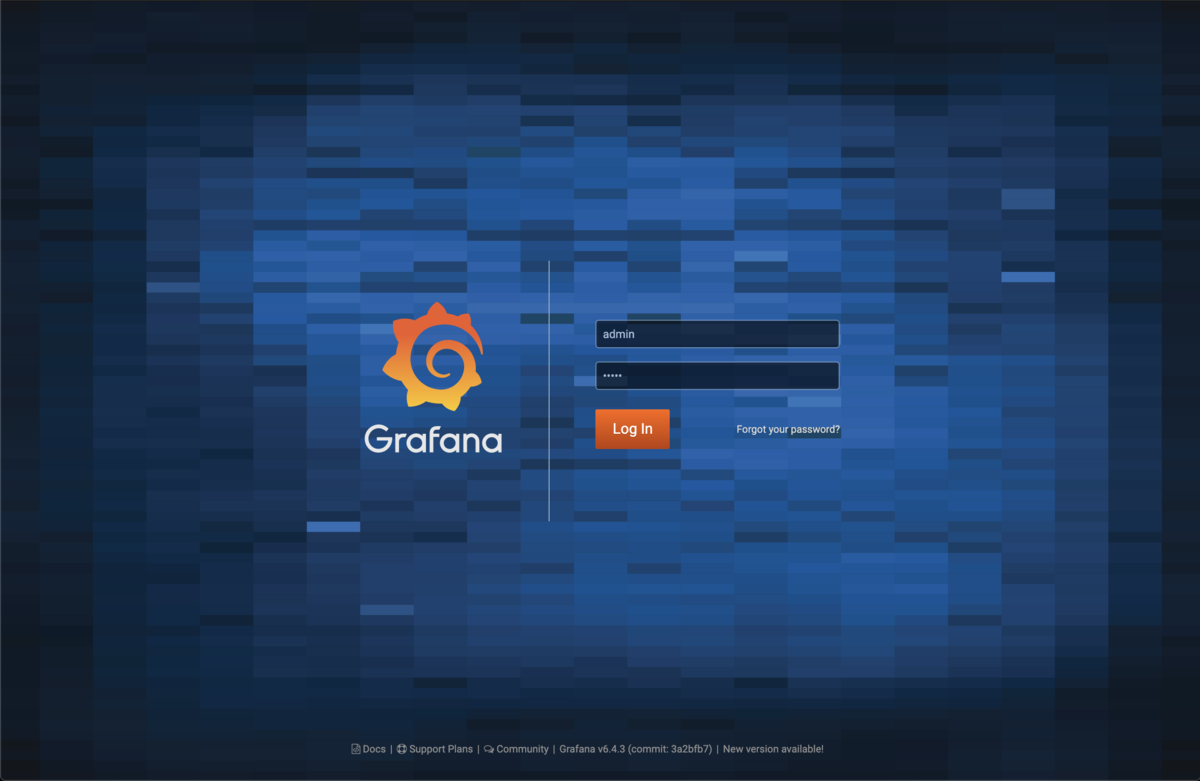
Grafanaにブラウザから「http://MasterのIPアドレス:30039」でアクセスします. 最初図23のようなログイン画面が出てきますが,今回は事前にアカウントなどを作っていないのでデフォルトアカウントであるusername:admin・password:adminで入ります.
ログインしたら図24のようなページが表示されると思います. 左端バーの歯車マークを選択してData Sourcesをクリックしてください.
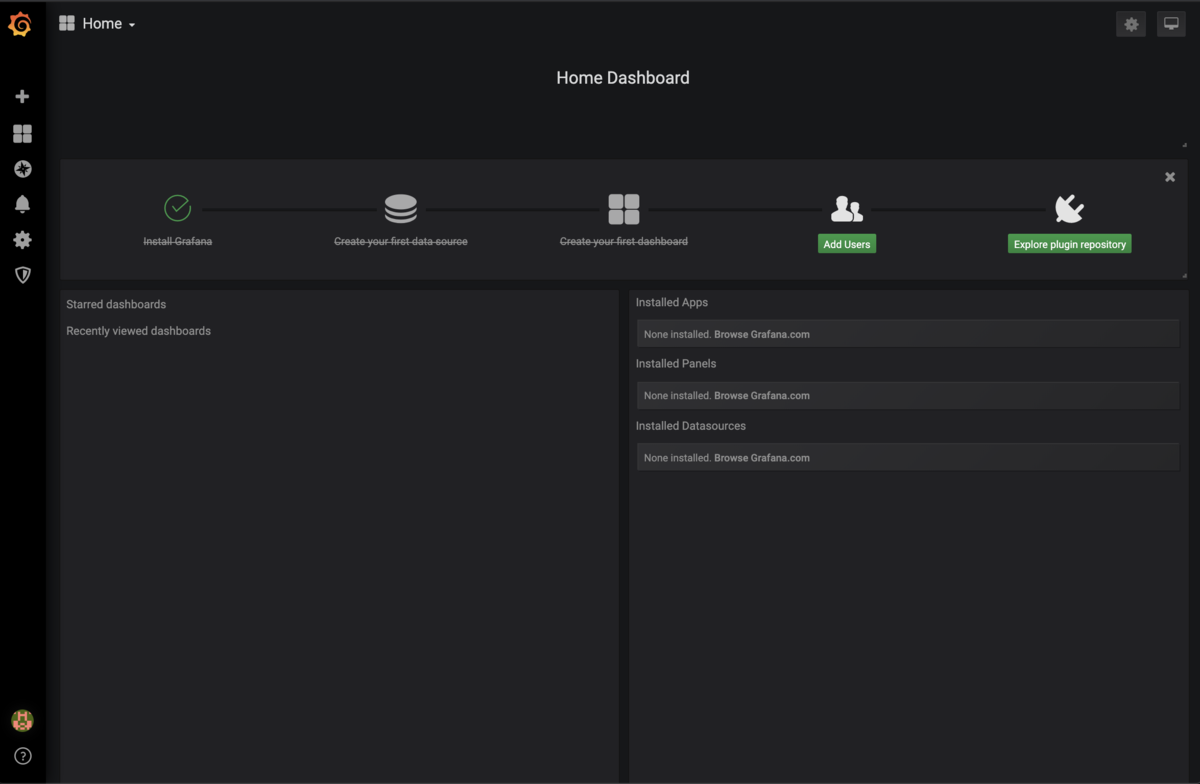
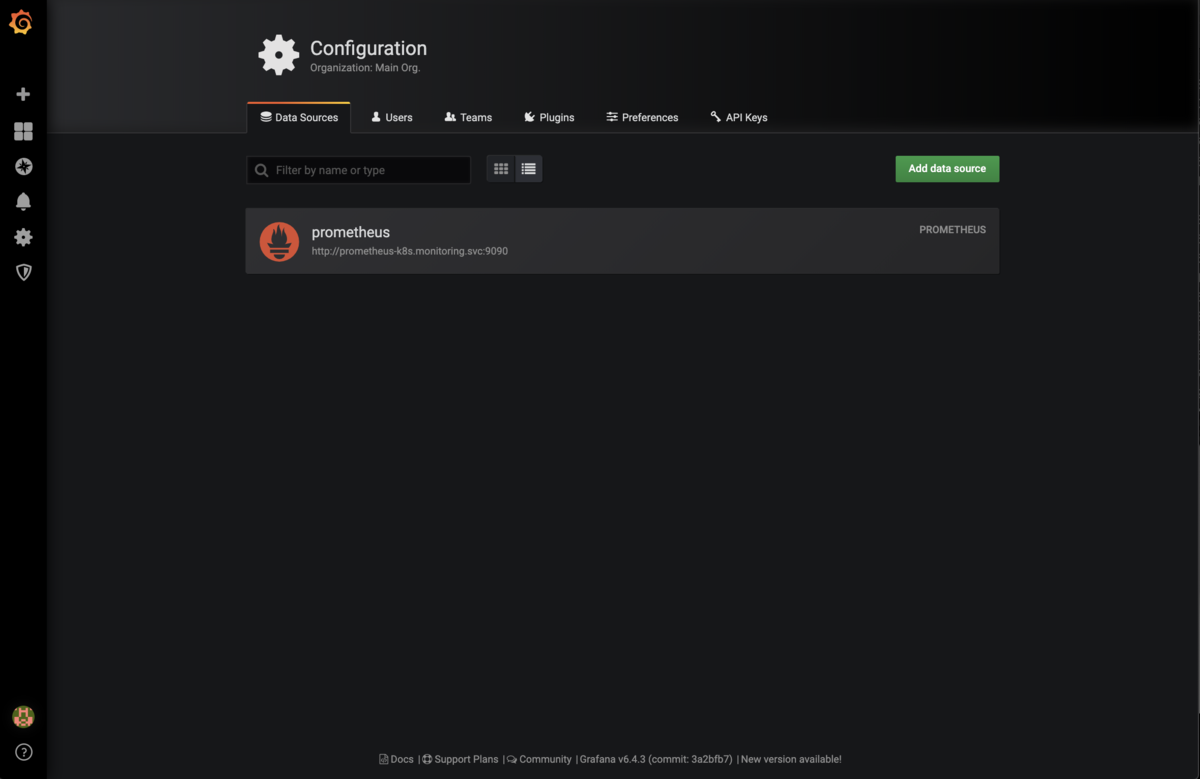
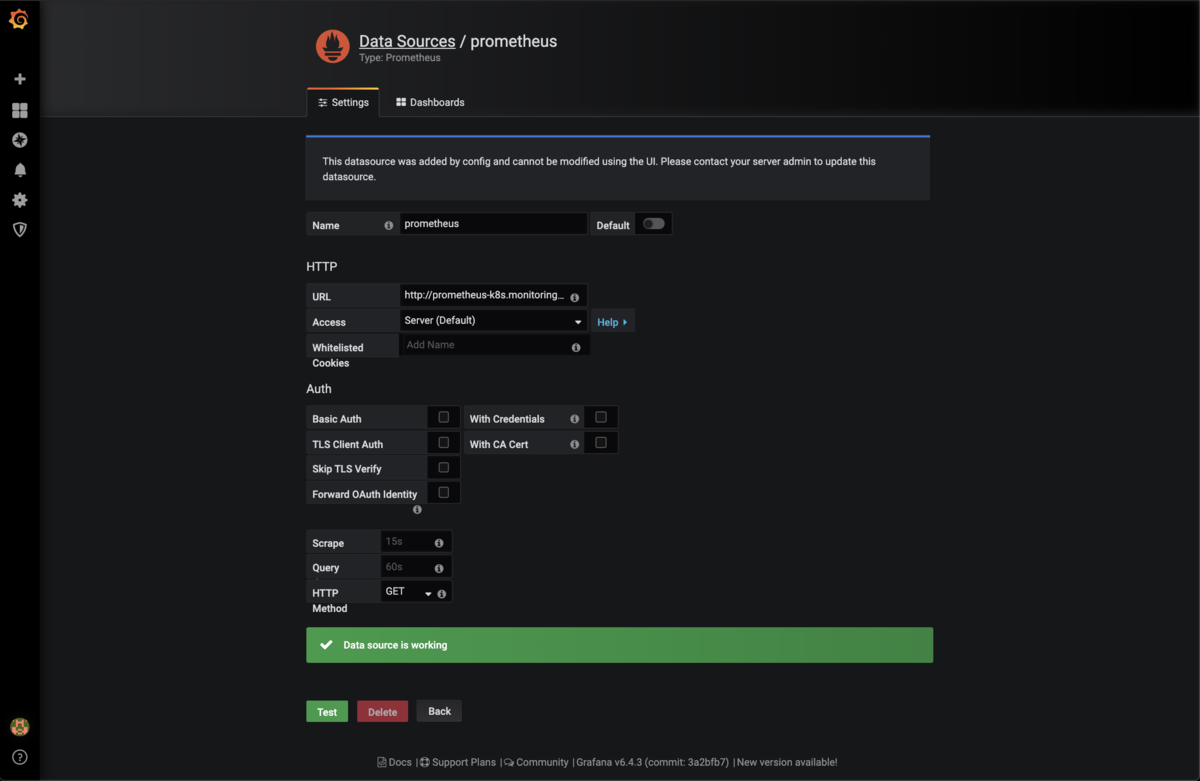
図25のようにGrafanaのData Sourcesはすでに登録されていると思います.
登録されていない場合は図26のように設定してください.設定されている場合でも一番下のTestボタンをクリックしてチェックを必ず行ってください.
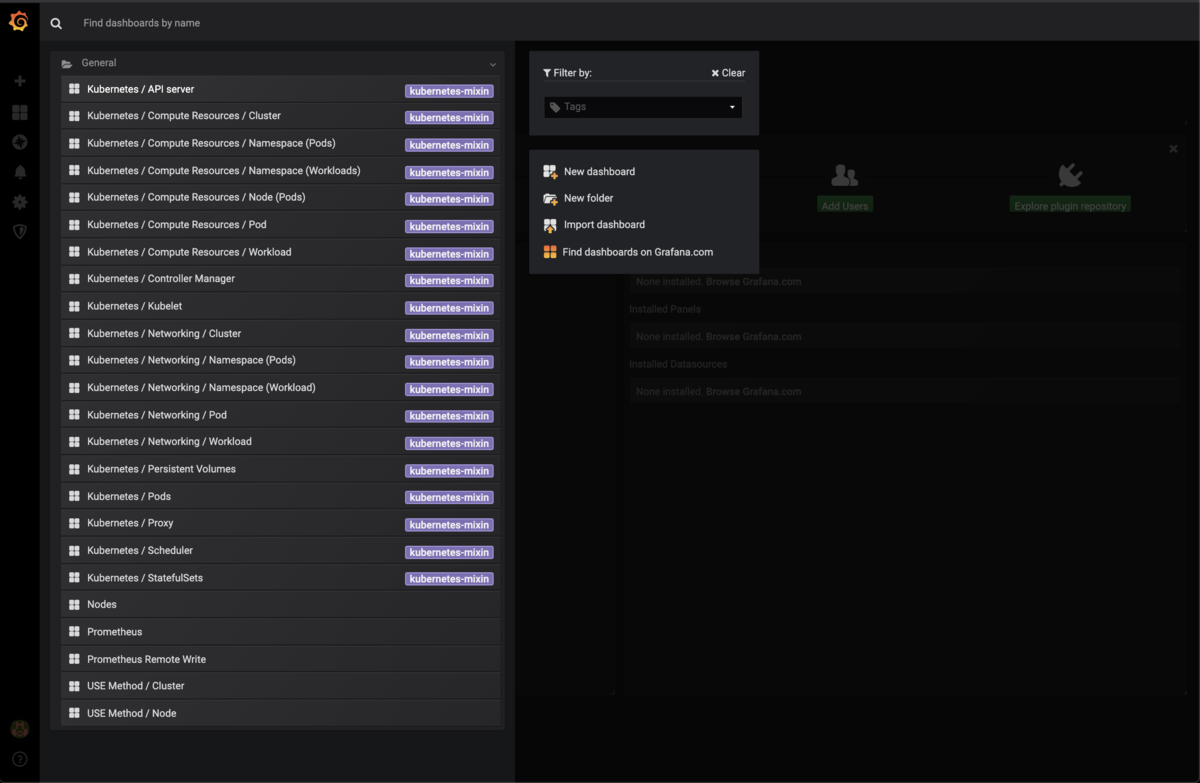
左端バー上のGrafanaのロゴをクリックして図24のページに戻った後Homeと書かれたタブをクリックして図27のように「Nodes」を選択します.
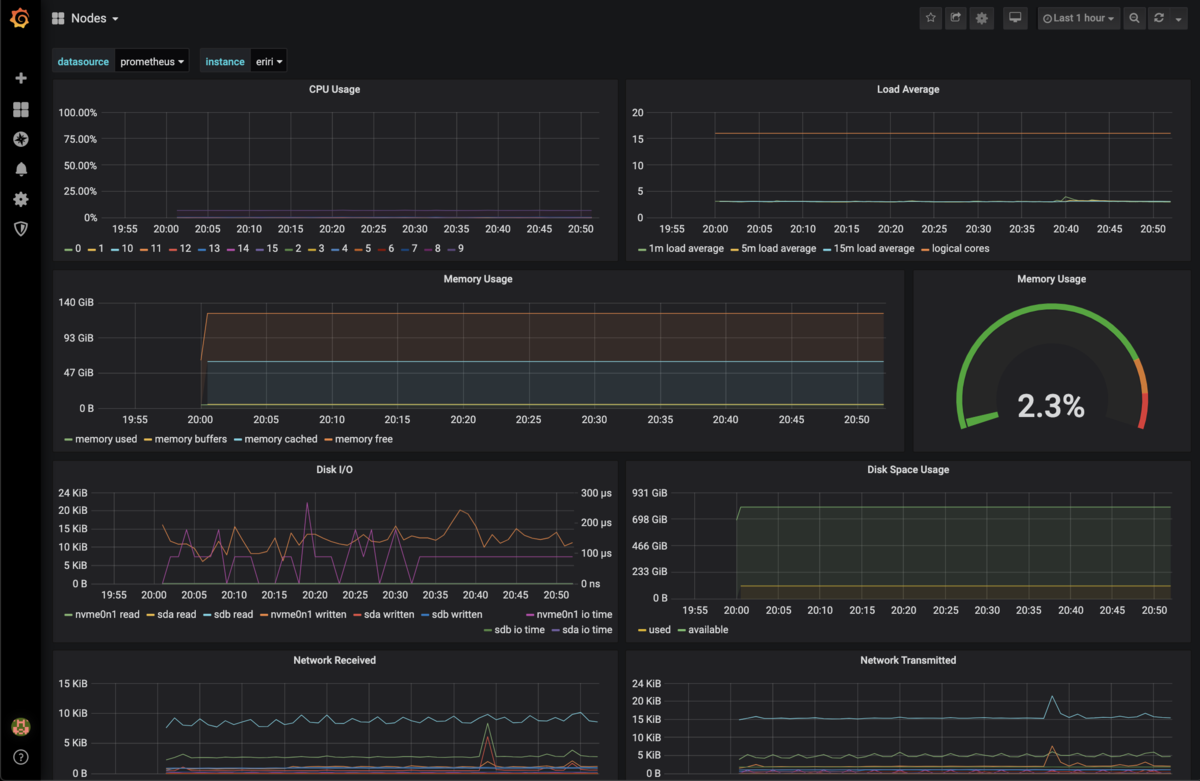
すると図28のようにデフォルトのグラフが表示されると思います.今回は簡易的にこのダッシュボードへGPUの温度グラフを追加してみたいと思います.
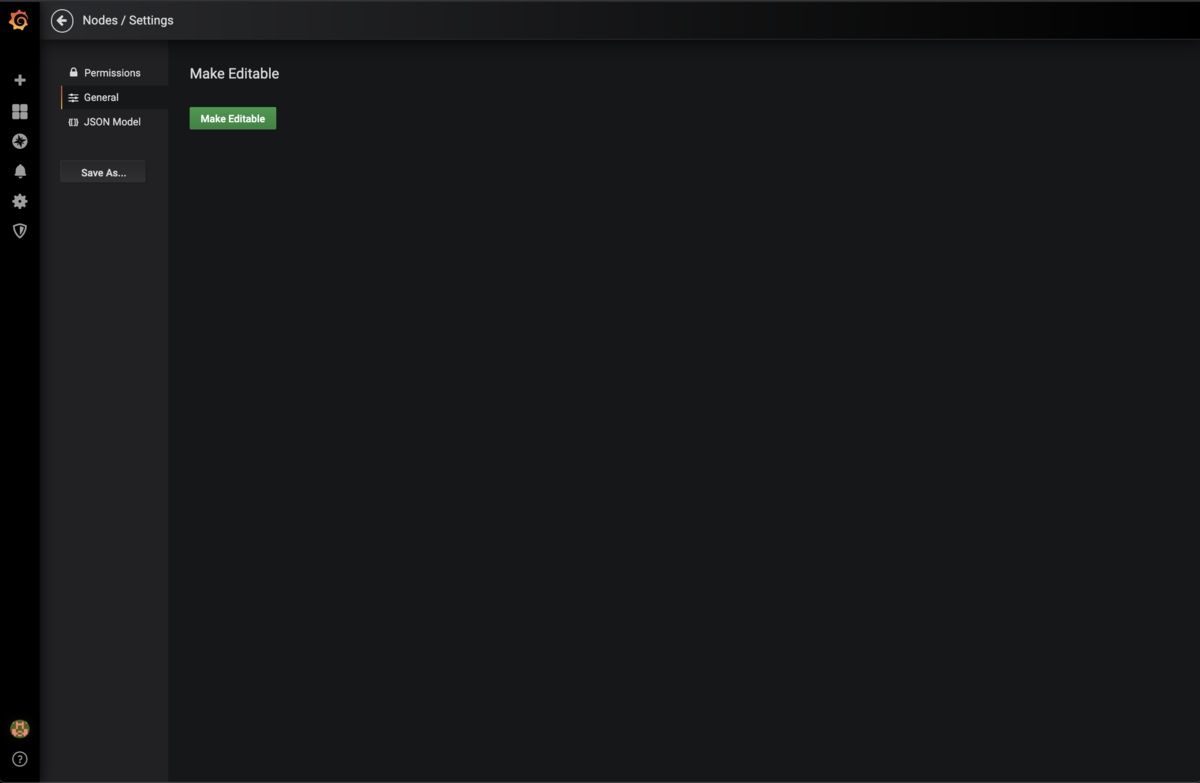
まず,右上の歯車マークのdashboard settingから図29のようなページにアクセスして「Make Editable」をクリックし,編集可能にします.
ダッシュボードのページに戻ると右上のバーに図30のようなボタンが増えていると思うので選択します.

選択すると図31のようにNew Panelが表示されると思うのでAdd Queryを選択します.
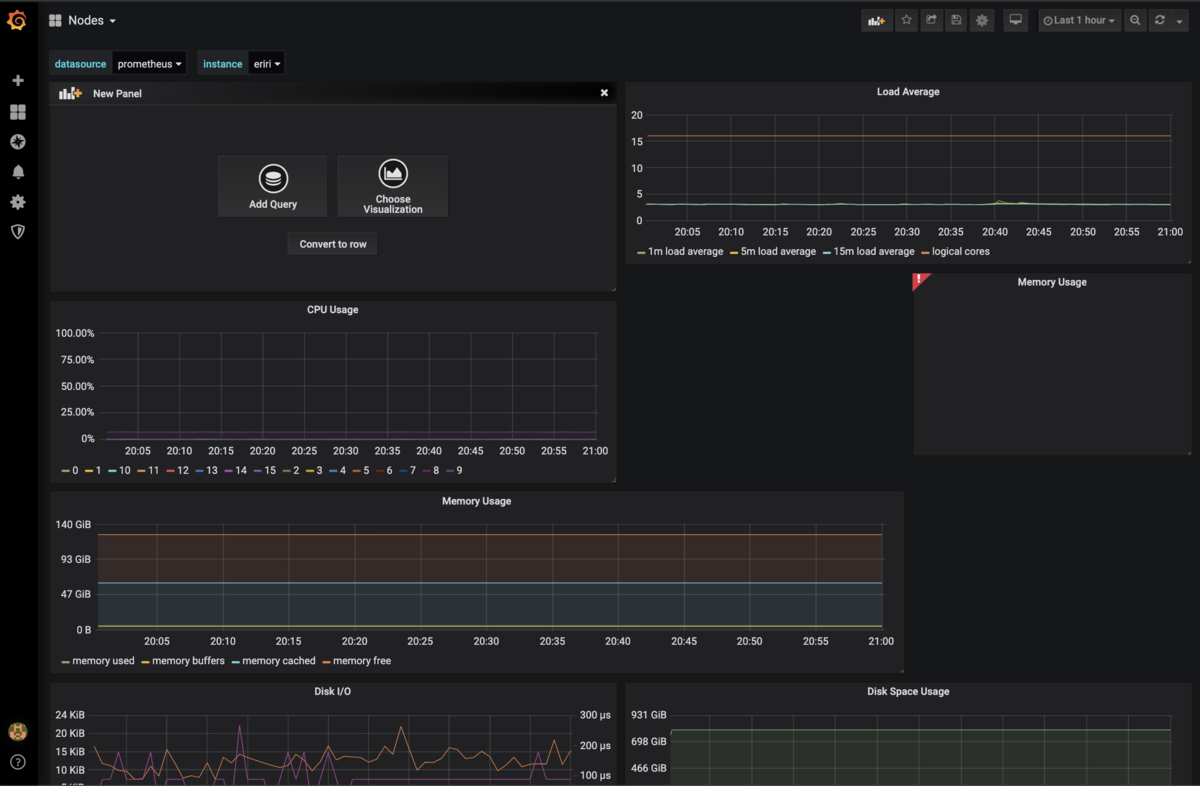
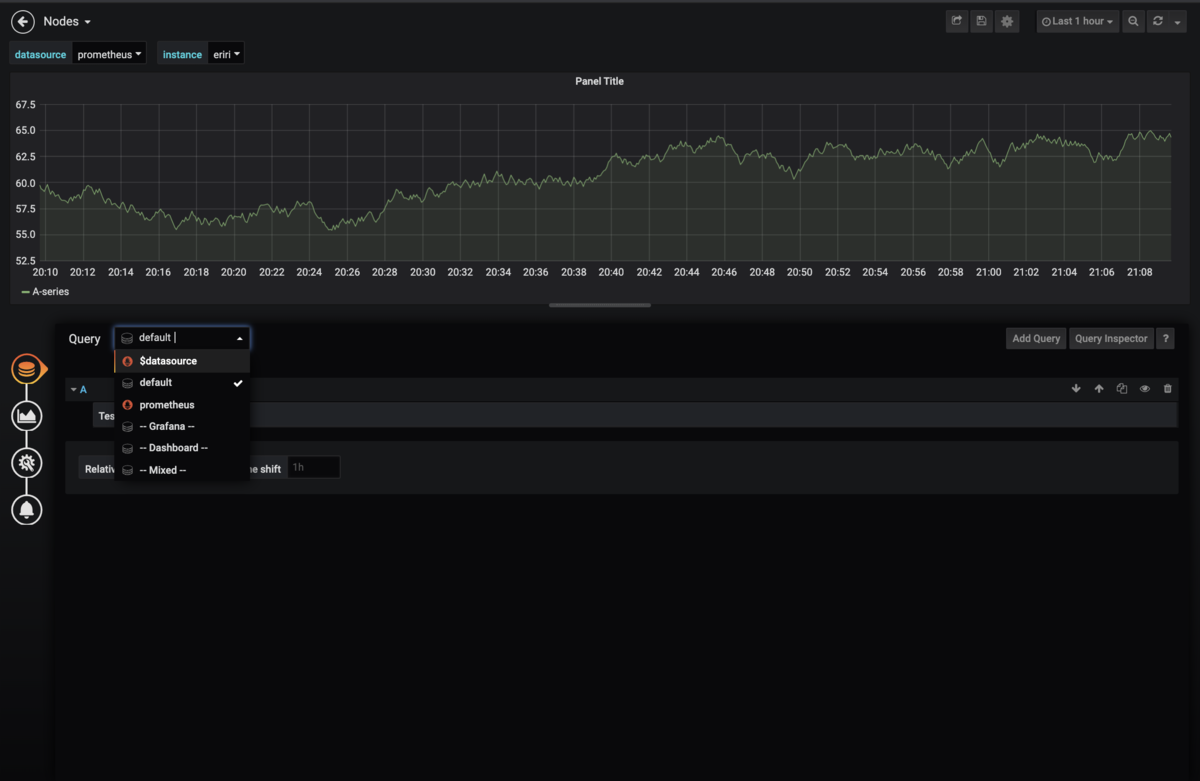
次に図32のページでQueryのタブを選択し,$datasourceを選択してください.
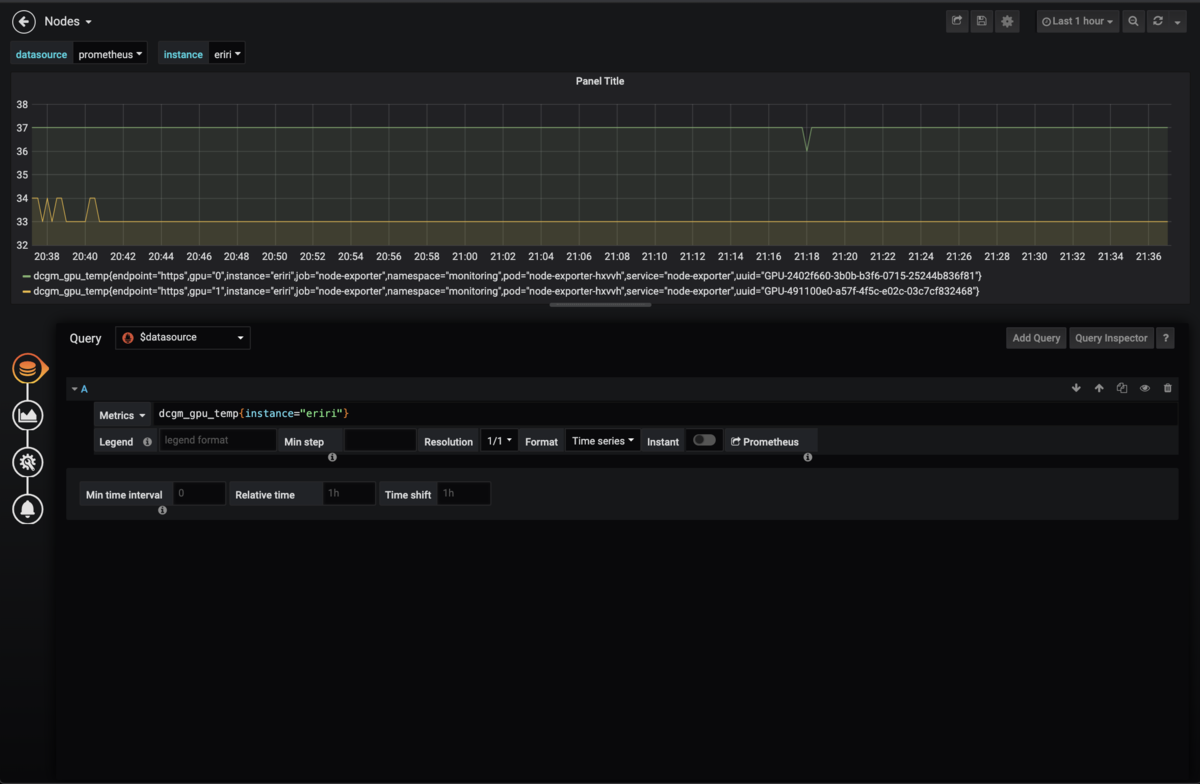
さらに図33のようにMetricsのところに「dcgm_gpu_temp{instance="eriri"}」と入力してエンターを押します.eririには表示したいノードを入力してください.
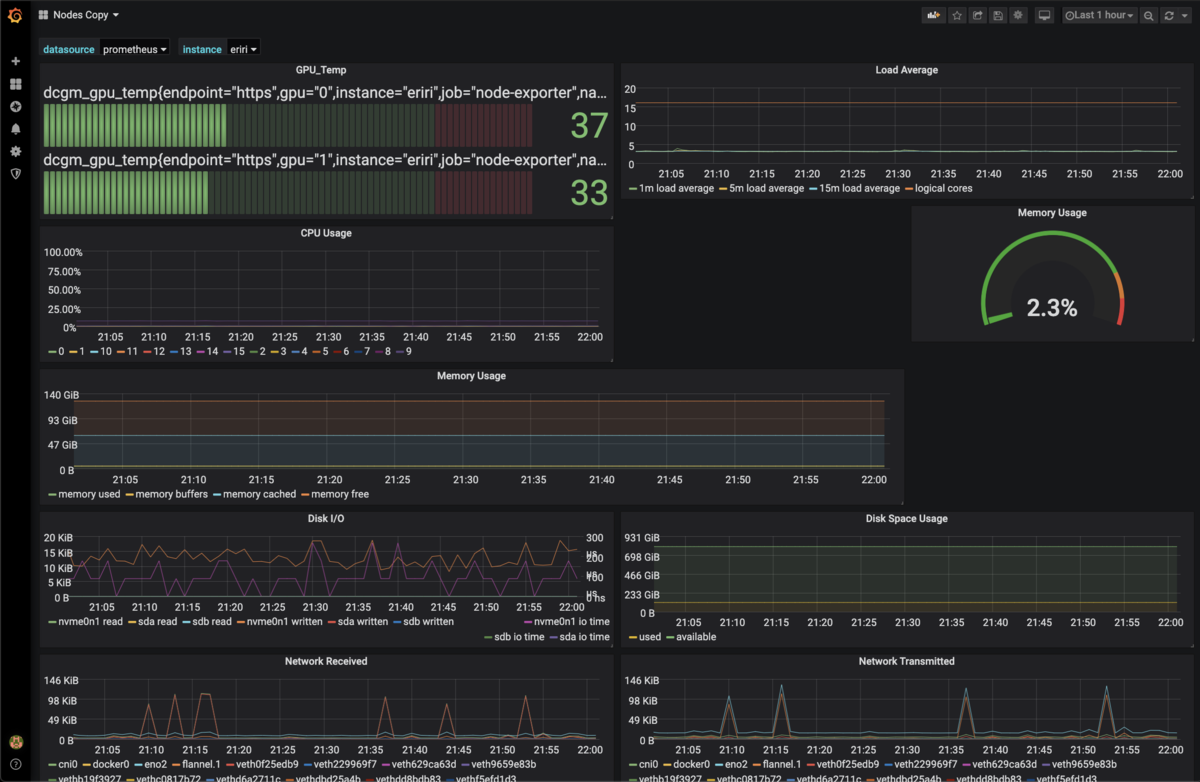
後は保存すれば図34のようになります.
最後に
GrafanaはPromQLを使用できるのでさらにダッシュボードを充実させることができます.今回はAlertの設定を行いませんでしたが,設定することで例えばGPUの温度が規定値以上になったらSlackやメールに通知するなどの応用も考えられます. また,今後CI/CD環境の構築も時間をみて実装していくつもりです.

