GitLab Runner on Kubernetesに敗北した話
はじめに
本ブログを開設以来実装の成功事例ばかり紹介してきましたが,今回は初の失敗したお話です.
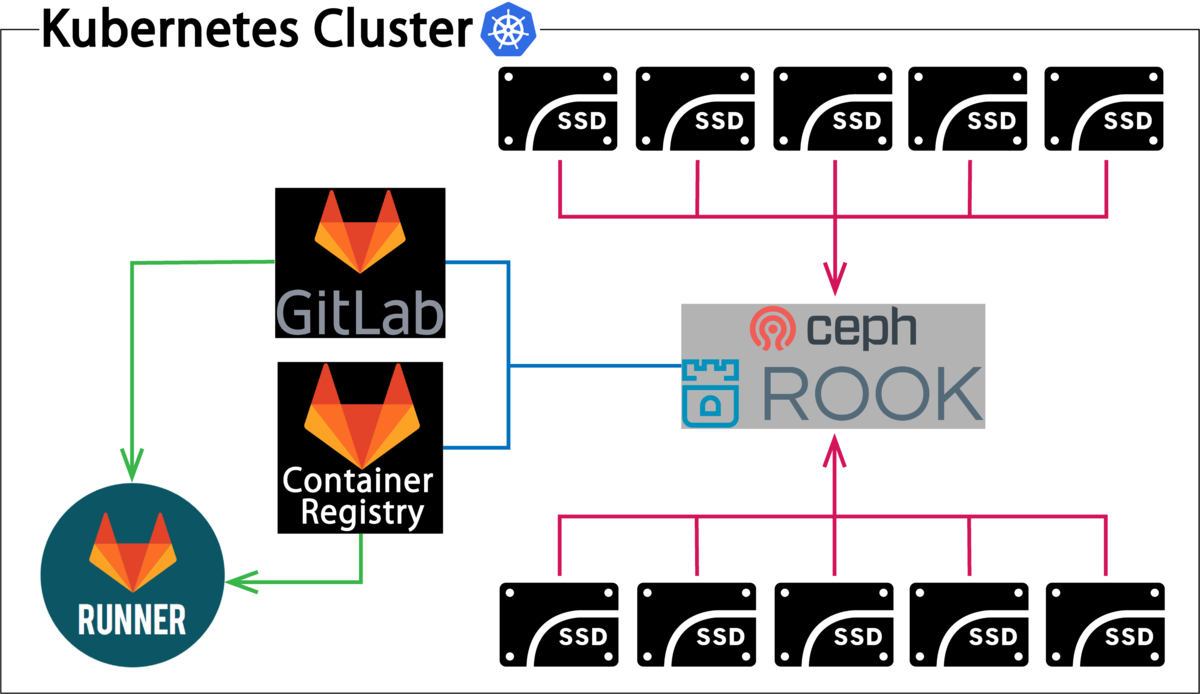
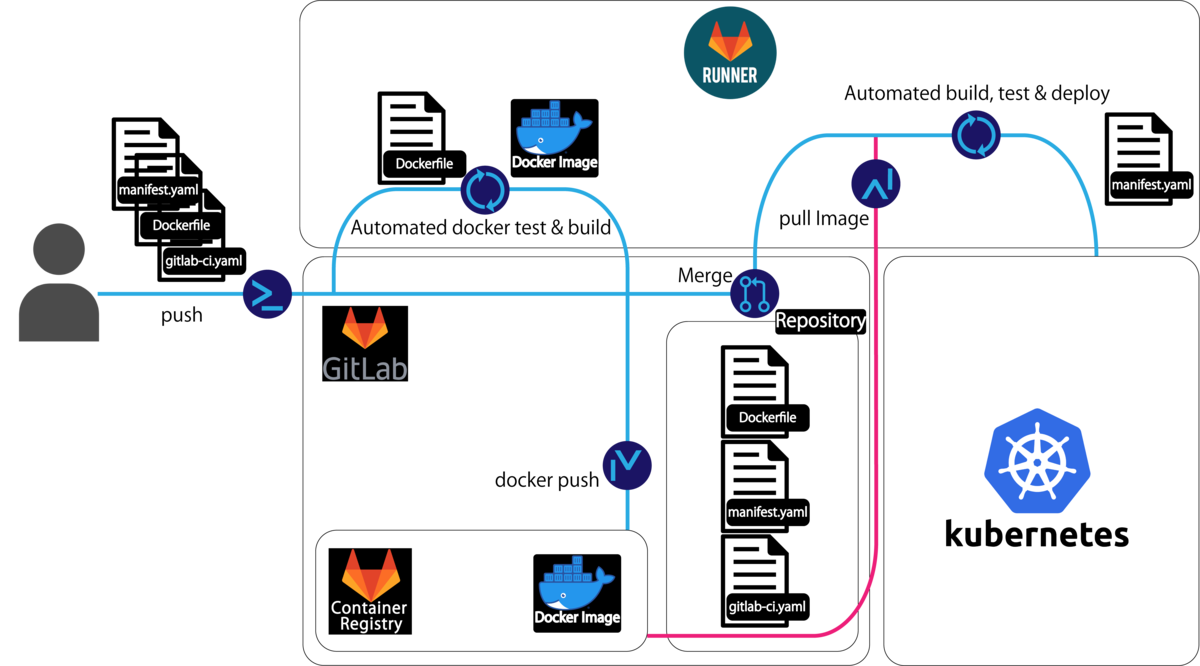
今回,図1のようなKubernets(以下k8s)の上にGitLabをのせて図2のようなk8sでのCI/CDパイプラインをしようと考えてはじめましたが,うまく行きませんでした.
前提条件
今回は本ブログでも紹介している以下の記事で構築しているk8s clusterの上にGitLab及びGitLab Runnerをインストールしました.使用環境では外部IPアドレスがなく,DNSサーバを勝手に建てることができない環境でしたのでLet's Encryptを使用することができませんでした.また,証明書を購入するのも資金的に難しかったため自己署名証明書を使用することといたしました.
Helmのインストール
今回はGitLab公式が用意しているhelmチャートを使用していくため,まずHelmをインストールします.また,HelmといえばRBAC環境下でのTillerのインストールで様々な問題がありましたが,Helm3系からTillerが必須ではなくなったため,そちらを使用します. 今回サーバPCはUbuntu16.04LTSで構成されているため下記Helm公式サイトのインストール方法に則ってインストールしていきます.
まず,下記GitHubのHelmリポジトリの図3で示す物をダウンロードします.
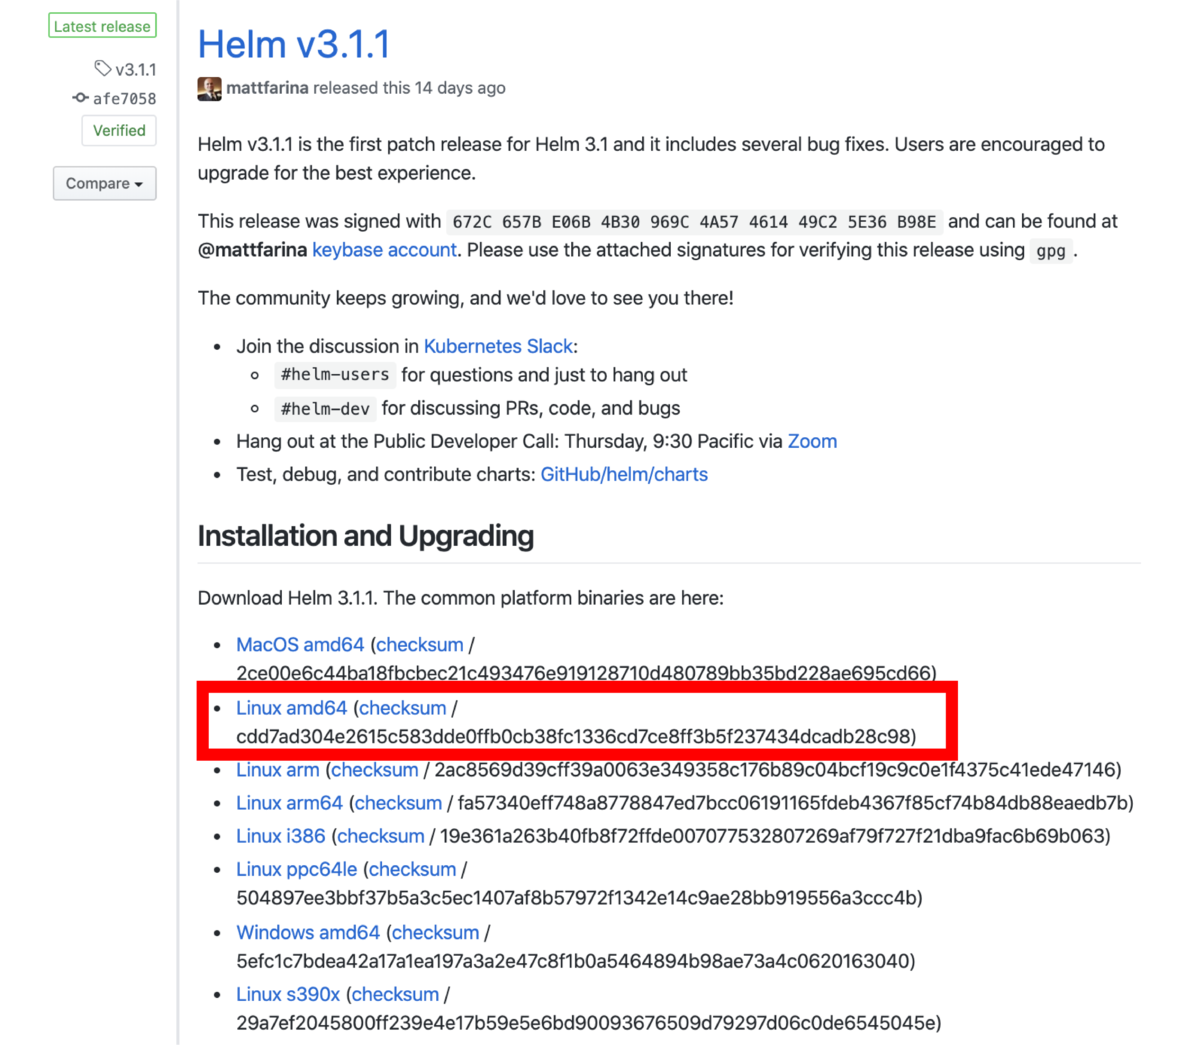
下記コマンドで解凍して,インストールします.その後解凍した「linux-amd64」の中に入っているHelmのバイナリ「helm」を「/usr/local/bin/」へ移動します.
$ tar -zxvf helm-v3.1.1-linux-amd64.tar.gz
$ mv linux-amd64/helm /usr/local/bin/helm
クライアント側ではMacを使用しているためhomebrewを使ってインストールしてください.
GitLabの設定変更
以下のコマンドを実行し,Helmを使用してGitLabリポジトリを追加します.
$ helm repo add gitlab https://charts.gitlab.io/
$ helm repo update
次に,Rook/CephをGitLabで使用できるように少しいじるためHelm Chartをダウンロードして解凍します.
$ helm pull gitlab/gitlab
$ tar -zxvf gitlab-3.1.1.tgz
まず,「gitlab/charts/gitlab/gitalyvalues.yaml」を下記のように1箇所変更します.
persistence:
  enabled: true

  ## git repositories Persistent Volume Storage Class
  ## If defined, storageClassName: <storageClass>
  ## If set to "-", storageClassName: "", which disables dynamic provisioning
  ## If undefined (the default) or set to null, no storageClassName spec is
  ##   set, choosing the default provisioner.  (gp2 on AWS, standard on
  ##   GKE, AWS & OpenStack)
  ##
- storageClass: "-"
+ storageClass: csi-cephfs
  accessMode: ReadWriteOnce
  size: 50Gi
次に,「gitlab/charts/gitlab/task-runner/values.yaml」の2箇所を変更します.
backups:
  cron:
    enabled: false
    concurrencyPolicy: Replace
    failedJobsHistoryLimit: 1
    schedule: "0 1 * * *"
    successfulJobsHistoryLimit: 3
    extraArgs: ""
    resources:
      # limits:
      #  cpu: 1
      #  memory: 2G
      requests:
        cpu: 50m
        memory: 350M
    persistence:
      enabled: false
      ## task-runner temporarily Persistent Volume Storage Class
      ## If defined, storageClassName: <storageClass>
      ## If set to "-", storageClassName: "", which disables dynamic provisioning
      ## If undefined (the default) or set to null, no storageClassName spec is
      ##   set, choosing the default provisioner.  (gp2 on AWS, standard on
      ##   GKE, AWS & OpenStack)
      ##
-     storageClass: "-"
+     storageClass: csi-cephfs
      accessMode: ReadWriteOnce
      size: 10Gi
      subPath: ""
## Enable persistence using Persistent Volume Claims
## ref: http://kubernetes.io/docs/user-guide/persistent-volumes/
##
persistence:
  enabled: false

  ## task-runner temporarily Persistent Volume Storage Class
  ## If defined, storageClassName: <storageClass>
  ## If set to "-", storageClassName: "", which disables dynamic provisioning
  ## If undefined (the default) or set to null, no storageClassName spec is
  ##   set, choosing the default provisioner.  (gp2 on AWS, standard on
  ##   GKE, AWS & OpenStack)
  ##
- storageClass: "-"
+ storageClass: csi-cephfs
  accessMode: ReadWriteOnce
  size: 10Gi
次に,「gitlab/charts/minio/values.yaml」を一箇所変更します.
## Enable persistence using Persistent Volume Claims
## ref: http://kubernetes.io/docs/user-guide/persistent-volumes/
##
persistence:
  enabled: true

  ## minio data Persistent Volume Storage Class
  ## If defined, storageClassName: <storageClass>
  ## If set to "-", storageClassName: "", which disables dynamic provisioning
  ## If undefined (the default) or set to null, no storageClassName spec is
  ##   set, choosing the default provisioner.  (gp2 on AWS, standard on
  ##   GKE, AWS & OpenStack)
  ##
- storageClass: "-"
+ storageClass: csi-cephfs
  accessMode: ReadWriteOnce
  size: 10Gi
次に,「gitlab/charts/postglesql/values.yaml」を二箇所変更します.
## Global Docker image parameters
## Please, note that this will override the image parameters, including dependencies, configured to use the global value
## Current available global Docker image parameters: imageRegistry and imagePullSecrets
##
global:
  postgresql: {}
#   imageRegistry: myRegistryName
#   imagePullSecrets:
#     - myRegistryKeySecretName
-  storageClass: myStorageClass
+  storageClass: csi-cephfs
persistence:
  enabled: true
  ## A manually managed Persistent Volume and Claim
  ## If defined, PVC must be created manually before volume will be bound
  ## The value is evaluated as a template, so, for example, the name can depend on .Release or .Chart
  ##
  # existingClaim:

  ## The path the volume will be mounted at, useful when using different
  ## PostgreSQL images.
  ##
  mountPath: /bitnami/postgresql

  ## The subdirectory of the volume to mount to, useful in dev environments
  ## and one PV for multiple services.
  ##
  subPath: ""

- storageClass: "-"
+ storageClass: "csi-cephfs"
  accessModes:
    - ReadWriteOnce
  size: 8Gi
  annotations: {}
最後に,「gitlab/charts/redis/values.yaml」を三箇所変更します.
## Global Docker image parameters
## Please, note that this will override the image parameters, including dependencies, configured to use the global value
## Current available global Docker image parameters: imageRegistry and imagePullSecrets
##
global:
#   imageRegistry: myRegistryName
#   imagePullSecrets:
#     - myRegistryKeySecretName
#   storageClass: myStorageClass
  storageClass: csi-cephfs
  redis: {}
master:
  ## Redis command arguments
  ##
  ## Can be used to specify command line arguments, for example:
  ##
  command: "/run.sh"
  ## Additional Redis configuration for the master nodes
  ## ref: https://redis.io/topics/config
  ##
  configmap:
  ## Redis additional command line flags
  ##
  ## Can be used to specify command line flags, for example:
  ##
  ## extraFlags:
  ##  - "--maxmemory-policy volatile-ttl"
  ##  - "--repl-backlog-size 1024mb"
  extraFlags: []
  ## Comma-separated list of Redis commands to disable
  ##
  ## Can be used to disable Redis commands for security reasons.
  ## Commands will be completely disabled by renaming each to an empty string.
  ## ref: https://redis.io/topics/security#disabling-of-specific-commands
  ##
  disableCommands:
  - FLUSHDB
  - FLUSHALL

  ## Redis Master additional pod labels and annotations
  ## ref: https://kubernetes.io/docs/concepts/overview/working-with-objects/labels/
  podLabels: {}
  podAnnotations: {}

  ## Redis Master resource requests and limits
  ## ref: http://kubernetes.io/docs/user-guide/compute-resources/
  # resources:
  #   requests:
  #     memory: 256Mi
  #     cpu: 100m
  ## Use an alternate scheduler, e.g. "stork".
  ## ref: https://kubernetes.io/docs/tasks/administer-cluster/configure-multiple-schedulers/
  ##
  # schedulerName:

  ## Configure extra options for Redis Master liveness and readiness probes
  ## ref: https://kubernetes.io/docs/tasks/configure-pod-container/configure-liveness-readiness-probes/#configure-probes)
  ##
  livenessProbe:
    enabled: true
    initialDelaySeconds: 5
    periodSeconds: 5
    timeoutSeconds: 5
    successThreshold: 1
    failureThreshold: 5
  readinessProbe:
    enabled: true
    initialDelaySeconds: 5
    periodSeconds: 5
    timeoutSeconds: 1
    successThreshold: 1
    failureThreshold: 5

  ## Redis Master Node selectors and tolerations for pod assignment
  ## ref: https://kubernetes.io/docs/concepts/configuration/assign-pod-node/#nodeselector
  ## ref: https://kubernetes.io/docs/concepts/configuration/assign-pod-node/#taints-and-tolerations-beta-feature
  ##
  # nodeSelector: {"beta.kubernetes.io/arch": "amd64"}
  # tolerations: []
  ## Redis Master pod/node affinity/anti-affinity
  ##
  affinity: {}

  ## Redis Master Service properties
  service:
    ##  Redis Master Service type
    type: ClusterIP
    port: 6379

    ## Specify the nodePort value for the LoadBalancer and NodePort service types.
    ## ref: https://kubernetes.io/docs/concepts/services-networking/service/#type-nodeport
    ##
    # nodePort:

    ## Provide any additional annotations which may be required. This can be used to
    ## set the LoadBalancer service type to internal only.
    ## ref: https://kubernetes.io/docs/concepts/services-networking/service/#internal-load-balancer
    ##
    annotations: {}
    labels: {}
    loadBalancerIP:
    # loadBalancerSourceRanges: ["10.0.0.0/8"]

  ## Enable persistence using Persistent Volume Claims
  ## ref: http://kubernetes.io/docs/user-guide/persistent-volumes/
  ##
  persistence:
    enabled: true
    ## The path the volume will be mounted at, useful when using different
    ## Redis images.
    path: /data
    ## The subdirectory of the volume to mount to, useful in dev environments
    ## and one PV for multiple services.
    subPath: ""
    ## redis data Persistent Volume Storage Class
    ## If defined, storageClassName: <storageClass>
    ## If set to "-", storageClassName: "", which disables dynamic provisioning
    ## If undefined (the default) or set to null, no storageClassName spec is
    ##   set, choosing the default provisioner.  (gp2 on AWS, standard on
    ##   GKE, AWS & OpenStack)
    ##
-   storageClass: "-"
+   storageClass: csi-cephfs
    accessModes:
    - ReadWriteOnce
    size: 8Gi
slave:
  ## Slave Service properties
  service:
    ## Redis Slave Service type
    type: ClusterIP
    ## Redis port
    port: 6379
    ## Specify the nodePort value for the LoadBalancer and NodePort service types.
    ## ref: https://kubernetes.io/docs/concepts/services-networking/service/#type-nodeport
    ##
    # nodePort:

    ## Provide any additional annotations which may be required. This can be used to
    ## set the LoadBalancer service type to internal only.
    ## ref: https://kubernetes.io/docs/concepts/services-networking/service/#internal-load-balancer
    ##
    annotations: {}
    labels: {}
    loadBalancerIP:
    # loadBalancerSourceRanges: ["10.0.0.0/8"]

  ## Redis slave port
  port: 6379
  ## Can be used to specify command line arguments, for example:
  ##
  command: "/run.sh"
  ## Additional Redis configuration for the slave nodes
  ## ref: https://redis.io/topics/config
  ##
  configmap:
  ## Redis extra flags
  extraFlags: []
  ## List of Redis commands to disable
  disableCommands:
  - FLUSHDB
  - FLUSHALL

  ## Redis Slave pod/node affinity/anti-affinity
  ##
  affinity: {}

  ## Configure extra options for Redis Slave liveness and readiness probes
  ## ref: https://kubernetes.io/docs/tasks/configure-pod-container/configure-liveness-readiness-probes/#configure-probes)
  ##
  livenessProbe:
    enabled: true
    initialDelaySeconds: 30
    periodSeconds: 10
    timeoutSeconds: 5
    successThreshold: 1
    failureThreshold: 5
  readinessProbe:
    enabled: true
    initialDelaySeconds: 5
    periodSeconds: 10
    timeoutSeconds: 10
    successThreshold: 1
    failureThreshold: 5

  ## Redis slave Resource
  # resources:
  #   requests:
  #     memory: 256Mi
  #     cpu: 100m

  ## Redis slave selectors and tolerations for pod assignment
  # nodeSelector: {"beta.kubernetes.io/arch": "amd64"}
  # tolerations: []

  ## Use an alternate scheduler, e.g. "stork".
  ## ref: https://kubernetes.io/docs/tasks/administer-cluster/configure-multiple-schedulers/
  ##
  # schedulerName:

  ## Redis slave pod Annotation and Labels
  podLabels: {}
  podAnnotations: {}

  ## Redis slave pod priorityClassName
  # priorityClassName: {}

  ## Enable persistence using Persistent Volume Claims
  ## ref: http://kubernetes.io/docs/user-guide/persistent-volumes/
  ##
  persistence:
    enabled: true
    ## The path the volume will be mounted at, useful when using different
    ## Redis images.
    path: /data
    ## The subdirectory of the volume to mount to, useful in dev environments
    ## and one PV for multiple services.
    subPath: ""
    ## redis data Persistent Volume Storage Class
    ## If defined, storageClassName: <storageClass>
    ## If set to "-", storageClassName: "", which disables dynamic provisioning
    ## If undefined (the default) or set to null, no storageClassName spec is
    ##   set, choosing the default provisioner.  (gp2 on AWS, standard on
    ##   GKE, AWS & OpenStack)
    ##
-   storageClass: "-"
+   storageClass: csi-cephfs
    accessModes:
    - ReadWriteOnce
    size: 8Gi
このhelm chartで今回使用しない下記のパッケージをオフにします.また,prometheusとgrafanaは以前の記事で実装した物を使用します.
- cert manager
- cert manager-issuer
- prometheus
- grafana
「/gitlab/charts/values.yaml」を下記のように変更してください.
## Installation & configuration of jetstack/cert-manager
## See requirements.yaml for current version
certmanager:
  createCustomResource: true
  nameOverride: cert-manager
  # Install cert-manager chart. Set to false if you already have cert-manager
  # installed or if you are not using cert-manager.
- install: true
+ install: false
  # Other cert-manager configurations from upstream
  # See https://github.com/jetstack/cert-manager/blob/master/deploy/charts/cert-manager/README.md#configuration
  rbac:
    create: true
  webhook:
    enabled: false
## The global properties are used to configure multiple charts at once.
## Extended documenation at doc/charts/globals.md
global:
  ## GitLab operator is Alpha. Not for production use.
  operator:
    enabled: false
    rollout:
      # Enables automatic pause for deployment rollout. This must be set to `true` to fix
      # Helm's issue with 3-way merge. See:
      #   https://gitlab.com/gitlab-org/charts/gitlab/issues/1262
      #   https://github.com/helm/helm/issues/3805
      autoPause: true

  ## doc/installation/deployment.md#deploy-the-community-edition
#  edition: ee
  edition: ce

  ## doc/charts/globals.md#gitlab-version
  # gitlabVersion: master

...(省略)

  ## doc/charts/globals.md#configure-minio-settings
  minio:
    enabled: true
    credentials: {}
      # secret:

  ## doc/charts/globals.md#configure-grafana-integration
  grafana:
-   enabled: true
+   enabled: false
## Installation & configuration of stable/prometheus
## See requirements.yaml for current version
prometheus:
- install: true
+ install: false
  rbac:
#    create: true
    create: false
  alertmanager:
    enabled: false
  alertmanagerFiles:
    alertmanager.yml: {}
  kubeStateMetrics:
    enabled: false
  nodeExporter:
    enabled: false
  pushgateway:
    enabled: false
  server:
    retention: 15d

## Configuration of Redis
## doc/architecture/decisions.md#redis
## doc/charts/redis
# redis:
次にデフォルトではEnterprise Editionになっているところ,GitLab Comunity Editionを使用するため,下記のように「/gitlab/charts/values.yaml」を下記のように変更してください.
## The global properties are used to configure multiple charts at once.
## Extended documenation at doc/charts/globals.md
global:
  ## GitLab operator is Alpha. Not for production use.
  operator:
    enabled: false
    rollout:
      # Enables automatic pause for deployment rollout. This must be set to `true` to fix
      # Helm's issue with 3-way merge. See:
      #   https://gitlab.com/gitlab-org/charts/gitlab/issues/1262
      #   https://github.com/helm/helm/issues/3805
      autoPause: true

  ## doc/installation/deployment.md#deploy-the-community-edition
- edition: ee
+ edition: ce
GitLabは標準でingressを使用するためホスト名が必要です. 「/gitlab/charts/values.yaml」の以下の項目でホスト名を指定してください.externalIPは任意です.
## The global properties are used to configure multiple charts at once.
## Extended documenation at doc/charts/globals.md
global:
  ## GitLab operator is Alpha. Not for production use.
  operator:
    enabled: false
    rollout:
      # Enables automatic pause for deployment rollout. This must be set to `true` to fix
      # Helm's issue with 3-way merge. See:
      #   https://gitlab.com/gitlab-org/charts/gitlab/issues/1262
      #   https://github.com/helm/helm/issues/3805
      autoPause: true

  ## doc/installation/deployment.md#deploy-the-community-edition
#  edition: ee
  edition: ce

  ## doc/charts/globals.md#gitlab-version
  # gitlabVersion: master

  ## doc/charts/globals.md#application-resource
  application:
    create: false
    links: []
    allowClusterRoles: true
  ## doc/charts/globals.md#configure-host-settings
  hosts:
+   domain: tenzen.local
    hostSuffix:
    https: true
+   externalIP: xxx.xxx.xxx.xxx
    ssh: ~
    gitlab: {}
    minio: {}
    registry: {}
    tls: {}
前提条件で説明したように今回は自己署名証明書を使用するため,以下のGitLab公式説明の「Option 4: Use auto-generated self-signed wildcard certificate」に則って「/gitlab/charts/values.yaml」を変更します.
cermanagerのインストールは先ほどオフにしたので残り二箇所の変更をすれば良いのですが,今回はGitLab Runnerを使用したいためGitLab Runnerはオフにしません.
上記公式ドキュメントにも「The gitlab-runner chart does not function properly with self-signed certificates. We recommend disabling it, as shown below.」と書いてありますが,無理やりPodの中に自己署名証明書などを突っ込めば動くだろうと考えてGitLab Runnerをオンの状態にしておりますが,色々行った結果(後述)動きませんでした...
## The global properties are used to configure multiple charts at once.
## Extended documenation at doc/charts/globals.md
global:
  ## GitLab operator is Alpha. Not for production use.
  operator:
    enabled: false
    rollout:
      # Enables automatic pause for deployment rollout. This must be set to `true` to fix

...(省略)

  ## doc/charts/globals.md#configure-ingress-settings
  ingress:
-   configureCertmanager: true
+   configureCertmanager: false
    annotations: {}
    enabled: true
    tls: {}
    #   enabled: true
    #   secretName:
    secretName: gitlab-cert
Ingressリソース
GitLab のサービスをk8s cluster外に出す際にingress nginx controller を使用するのですが,本ブログではingress nginx controllerは初出ですので少し説明しておきます. 以下の書籍を参考にさせていただきました.

Kubernetes完全ガイド (impress top gear)
- 作者:青山 真也
- 発売日: 2018/09/21
- メディア: 単行本(ソフトカバー)
まずingressリソースとは,ClusterIPやNodePortやLoadBalancerなどのようなServiceと同様にコンテナを外部に公開するためのリソースの一つで,L7のロードバランサです.ClusterIPなどの詳細は下記記事をご覧ください.
L4ロードバランサであるType ServiceのLoadBalancerなどと比べて,パスベースでルーティングでき,k8sクラスタ外部IPアドレスの数を少なくできたりというメリットが存在します.
Ingressでも様々な種類があり,パブリッククラウドのマネージドk8sサービスではGKEでGKE Ingress,EKSではALB Ingressがありますが,今回はOSSとして公開されているIngress Nginxを使用していきます.
Ingress Nginxリソースは図4のような仕組みを持っています.
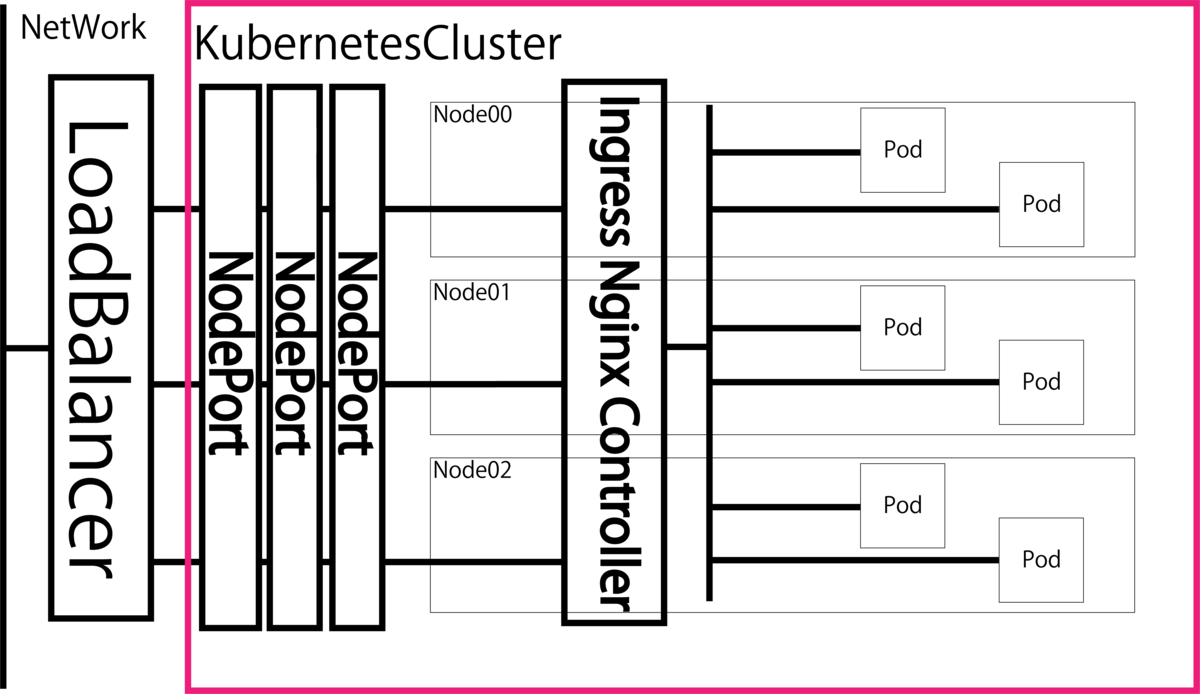
ingress nginxリソースでは,Nodeportをバックエンドのサービスとして使用しており,外部とはLoadBalancer(or NodePort)を介して通信を行います.
LoadBalancerの実装
先ほども説明しましたが,Ingress Nginxサービスを利用するためには別途LoadBalancerが必要になります.GKEやEKSではパブリッククラウド側でLoadBalancerが準備されているため,Ingressリソースを作成するだけで自動でIPアドレスが払い出されて使用されますが,オンプレ環境の場合は自分で用意しなければなりません.今回はGoogleが作成して公開してくれているソフトウェアロードバランサのMetalLBを使用して,LoadBalancerを作っていきます.MetalLBについては以下のサイボウズさんのブログで詳しく解説されているので適宜参照してください.
まず,以下のマニフェストをGithubのmetallbリポジトリからダウンロードしてください.
また,今回はgitlab helm chartに入っているため必要ありませんが,別の用途でingress nginxを使用する際は,以下のマニフェストを使用します.
ダウンロードできたら,下記のようなMetalLBのconfigmapを作成します. 今回は「metallb_confingmap.yaml」という名前で作成しました.MetalLBにはBGPモードとL2モードがありますが,L2モードで作成していきます.また,マニフェスト内のaddress以下の「xxx.xxx.xxx.xxx-xxx.xxx.xxx.xxx」にはMetalLBで使用するIPアドレスの範囲を記述してください. (ex. 192.168.1.2-192.168.1.10)
apiVersion: v1
kind: ConfigMap
metadata:
  namespace: metallb-system
  name: config
data:
  config: |
    address-pools:
    - name: metallb-ip-range
      protocol: layer2
      addresses:
      - xxx.xxx.xxx.xxx-xxx.xxx.xxx.xxx
k8sにデプロイしていきます.
$ kubectl apply -f metallb.yaml
$ kubectl apply -f metallb_configmap.yaml
これでロードバランサの準備ができました.
Gitlabのデプロイ
実際にGitLabをデプロイしていきます. 以下のコマンドで先ほど作成したマニフェストを圧縮したのち,k8s clueterにデプロイしていきます.
$ helm package gitlab
$ kubectl create namespace gitlab
$ helm install gitlab gitlab-3.1.1.tgz -n gitlab
「gitlab install」コマンドはhelm3系から仕様が変わり,installの後に名前を指定するようになりまし.「-n」オプションでデプロイするnamespaceを選択しています.WEB-UIへは「https://gitlab.(登録したホスト名)」でアクセスできます.その際のユーザ名は「admin」でパスワードは以下のコマンドを実行すると取得できます.
$ kubectl get secret gitlab-gitlab-initial-root-password -ojsonpath={.data.password} -n gitlab | base64 --decode
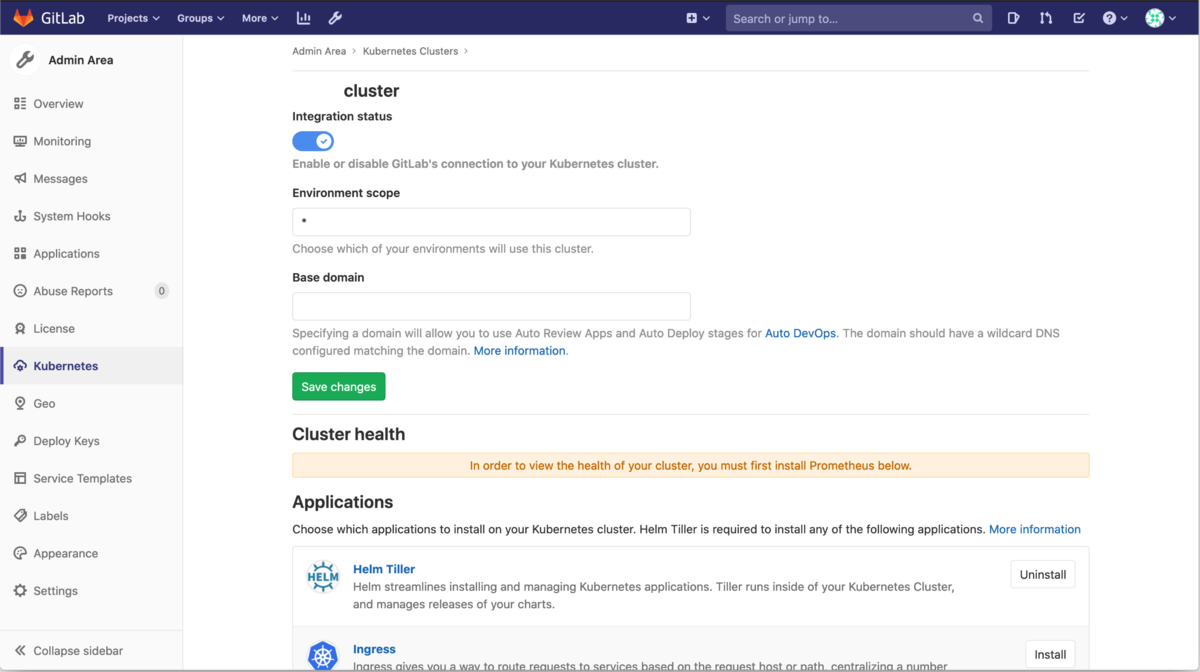
その後以下の公式ドキュメントにしたがってGitLabにk8s Clusterを登録してください.
その際,API URLを登録するところでプライベートIPアドレスを登録しようとするとエラーが出るため設定のネットワークの項目でプライベートIPアドレスの入力を許可してください.
正常に登録されたら以下のような画面が表示されるはずです.
本題
ここまでデプロイしてきましたが,自己署名証明書を用いているため公式ドキュメントに記載されているようにGitLabは動作しますが,GitLab Runnerは動きません.
「The gitlab-runner chart does not function properly with self-signed certificates. We recommend disabling it, as shown below.」
デプロイされたGitLab RunnerのPodを「stern」や「kubectl logs」コマンドを使ってログを見てみると以下のようなエラーがでます.
$ stern -n gitlab gitlab-gitlab-runner-xxxxx
...(省略)
x509: certificate signed by unknown authority
自己署名証明書を用いたGitLab Runnerの動かし方が以下の公式ドキュメントに記載されていたり,Qiitaの記事にDockerを用いた場合の自己証明証明書を使用したGitLab Runnerの動かし方が紹介されていたため,自己署名証明書を認識させようと行った方法を記述していきます.
- 「kubectl exec」コマンドを使ってGitlab RunnerのPodに直接証明書をコピーします.
- 自己署名証明書を利用してsecretリソースを作成し,GitLab RunnerのPodにボリュームとしてマウントする.
またどうしてもホスト名を解決してくれない場合もあるので,あまりやらない方がいいですが,以下の方法でkube-dnsに直接名前を記載します.
$ kubectl edit cm coredns -n kube-system
# Please edit the object below. Lines beginning with a '#' will be ignored,
# and an empty file will abort the edit. If an error occurs while saving this file will be
# reopened with the relevant failures.
#
apiVersion: v1
data:
  Corefile: |
    .:53 {
        errors
        health
        # 以下追加
        hosts {
           GitLabで使用しているロードバランサのIPアドレス gitlab.登録したホスト名
           fallthrough
        }
        kubernetes cluster.local in-addr.arpa ip6.arpa {
           pods insecure
補足
GitLabではIngressを用いてコンテナをk8s cluster外に公開しているためホスト名が必要です.そのため以下の方法でローカルネットワーク内でのみ使用可能な簡易DNSサーバをDockerを用いて作成しました.
DockerイメージはDockerHubの下記リポジトリを参考に作成します.
FROM alpine:3.9.5

RUN apk update && \
apk --no-cache add dnsmasq && \
echo -e "no-resolv\\naddn-hosts=/etc/hosts-dnsmasq\nserver=xxx.xxx.xxx.xxx(基本的な名前解決を行うDNSサーバのIPアドレス)\nlog-queries" > /etc/dnsmasq.conf && \
echo -e "xxx.xxx.xxx.xxx(ホスト名に対応するIPアドレス) gitlab.hoge.hoge(登録したホスト名)" > /etc/hosts-dnsmasq

EXPOSE 53

CMD ["dnsmasq","-k"]
DNSサーバが使用する53番ポートを解放後,Dockerfileをビルドしてdnsサーバを建てます.
$ sudo ufw allow 53
$ docker build -t dns-server .
$ sudo docker run --name dnsmasq -d -p 53:53/udp --cap-add=NET_ADMIN hogehoge(イメージ名)
おわりに
今回はうまくいきませんでしたが,Let's Encryptなど証明書を取得できる環境では上記の手順+CertManagerの設定を行えば自動で証明書の更新も行われ,GitLab+GitLab Runnerを建てることができてk8sへのCI/CD環境が整うと思います.何か自己署名証明を使用した場合でも成功した例などがあれば教えていただけると嬉しいです.